GoCondor


What is GoCondor?
GoCondor is a Go web framework made for building web APIs, suitable for small, medium size and microservices projects. With it's simple structure, and developer friendly experience it helps with increasing the productivity.
Main Features
- Routing
- Middlewares
- Data Validation
- Databases ORM (GORM integrated)
- Emails
- JWT tokens
- Cache (Redis)
- HTTPS (TLS)
Installation
To create a new GoCondor project you need to install the GoCondor's cli first
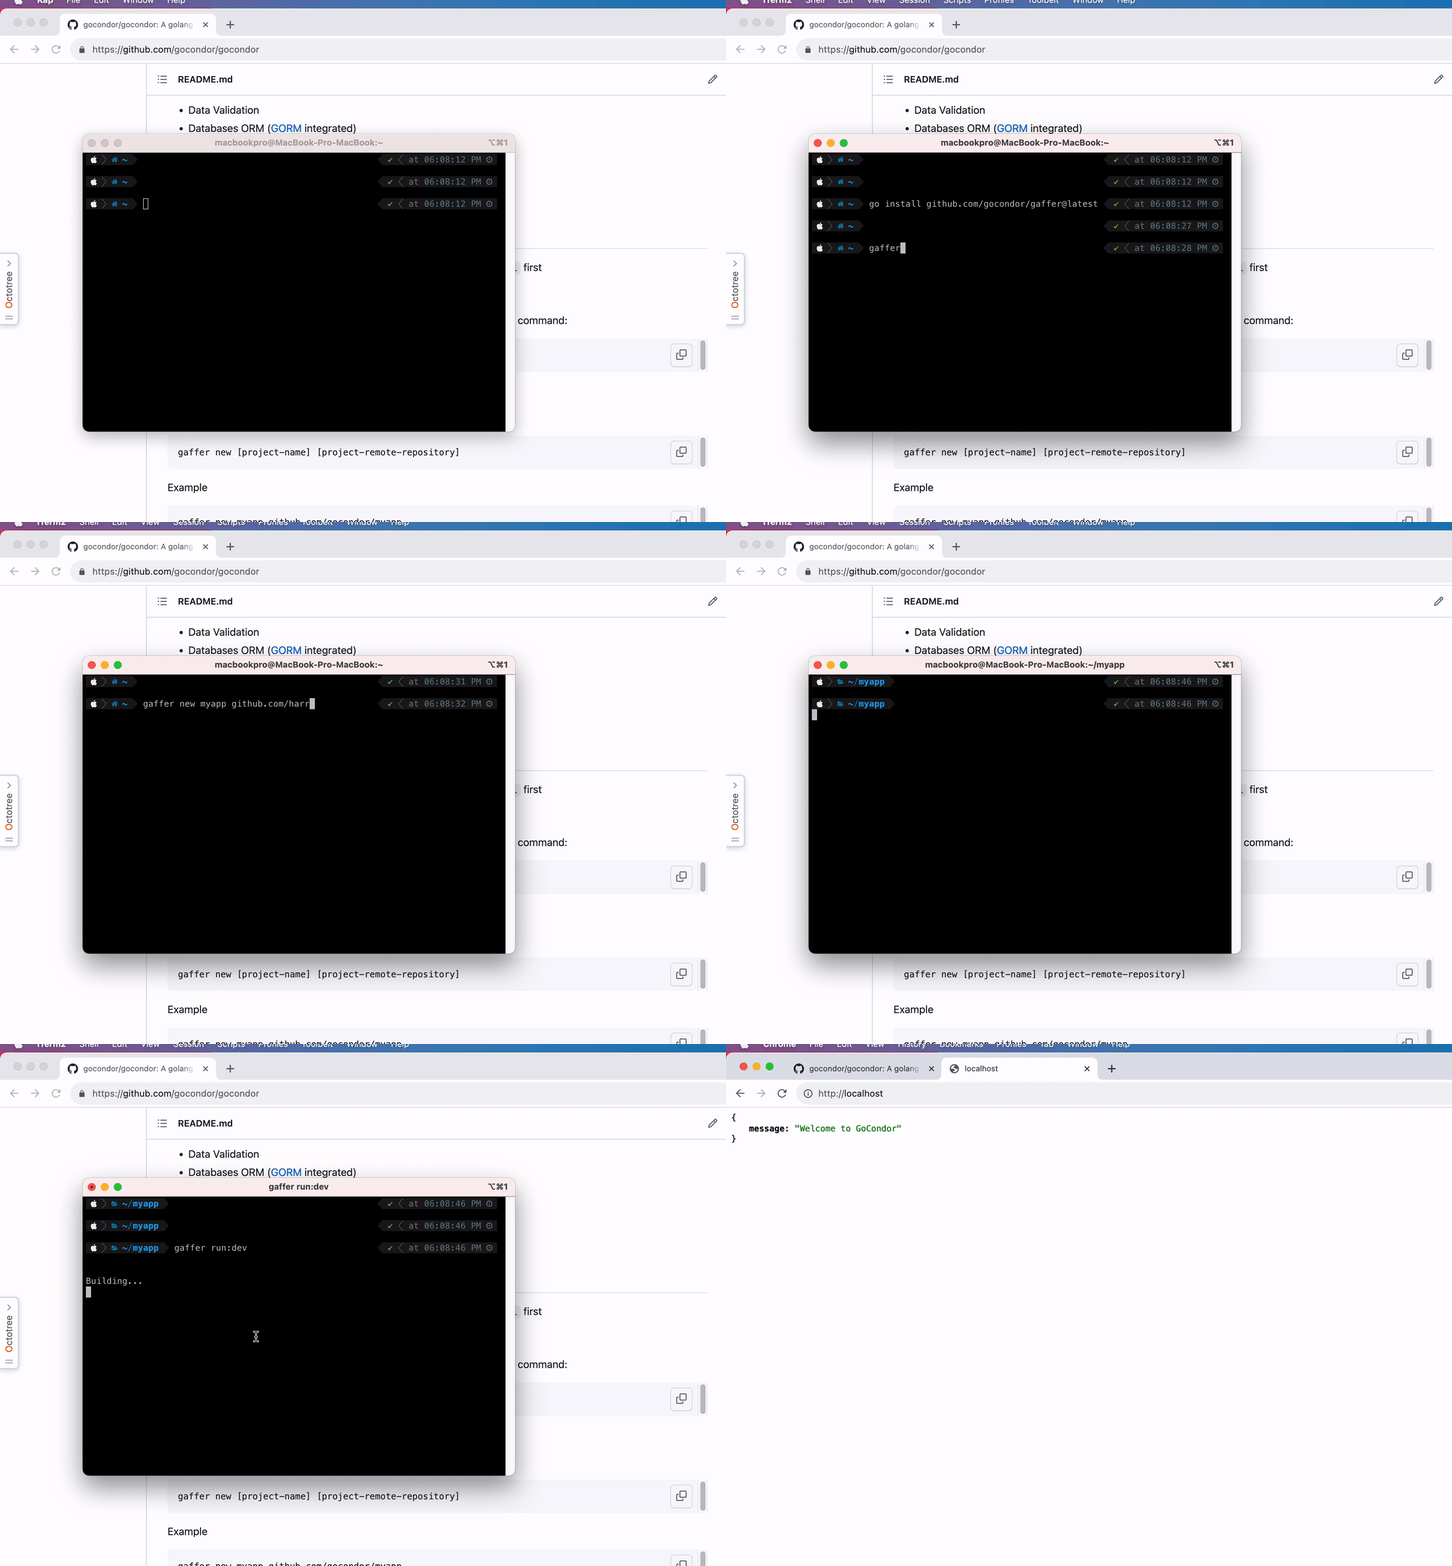
Install Gaffer [GoCondor's cli] tool
To install the gaffer globally open up your terminal and run the following command:
go install github.com/gocondor/gaffer@latest

Create new project using Gaffer
Here is how you can create new goCondor projects using gaffer
gaffer new [project-name] [project-remote-repository]
Example
gaffer new myapp github.com/gocondor/myapp
where:
project-name is the name of your project
remote-repository is the remote repository that will host the project, usually github.com is used.
Getting started
First make sure you have Gaffer installed, then use it to create a new project, here is how
Let's create a route that returns hello world
Open up the file routes.go in the root directory of your project and add the following code:
	router.Get("/greeting", func(c *core.Context) *core.Response {
		JsonString := `{"message": "hello world"}`

		return c.Response.Json(JsonString)
	})
Next, in your terminal navigate to the project dir and run the following command to start the live reloading:
gocondor run:dev
Finally, open up your browser and navigate to http://localhost/greeting
To learn more check the routing docs section
Architecture
The architecture is similar to MVC, where there is a routes file ./routes.go in which you can map all your app routes to their handlers which resides in the directory ./handlers. Handlers are simply methods that handles requests (GET, POST, ... etch) to the given routes.
The request journey:
The first component that receive's the request in GoCondor is the Router,
then GoCondor locates the matching handler of the request and it check's if there are any middlewares to be executed either before or after the handler, if so, it executes them in the right order, then at the final stage it returns the response to the user.
Request -> Router -> Optional Middlewares -> Handler -> Optional Middlewares -> Response
Folder structure
├── gocondor
│   ├── config/ --------------------------> main configs
│   ├── events/ --------------------------> contains events
│   │   ├── jobs/ ------------------------> contains the event jobs
│   ├── handlers/ ------------------------> route's handlers
│   ├── logs/ ----------------------------> app log files
│   ├── middlewares/ ---------------------> app middlewares
│   ├── models/ --------------------------> database models
│   ├── storage/ -------------------------> a place to store files
│   ├── tls/ -----------------------------> tls certificates
│   ├── .env -----------------------------> environment variables
│   ├── .gitignore -----------------------> .gitignore
│   ├── go.mod ---------------------------> Go modules
│   ├── LICENSE --------------------------> license
│   ├── main.go --------------------------> go main file
│   ├── README.md ------------------------> readme file
│   ├── register-events.go ---------------> register events and jobs
│   ├── register-global-middlewares.go ---> register global middlewares
│   ├── routes.go ------------------------> app routes
│   ├── run-auto-migrations.go -----------> database migrations
Contribute
The framework consists of two main parts, each lives in a separate repository, the first part is the core which contains the framework core packages. the second part is gocondor which has the project folder structure and responsible of gluing everything together.
To contribute you simply need to clone these two repositories locally and create new branches from the develop branch, add your changes, then open up a PR to the develop branch.
Here is how you can clone and set up the development workflow in your local machine:
- Create the organization
gocondor directory in your workspace, make sure the full path to it looks like below:
$GOPATH/src/ginthub.com/gocondor
- clone the repository
core inside the organization gocondor directory:
git clone git@github.com:gocondor/core.git
- clone the repository
gocondor:
git clone git@github.com:gocondor/gocondor.git
- cd into the project
gocondor and open up go.mod in your editor and add the line github.com/gocondor/gocondor/core => [full-local-path-to-core] to the replacestatement, make sure it looks something like this:
module github.com/gocondor/gocondor

replace (
github.com/gocondor/core => /path-to-go-workspace/src/ginthub.com/gocondor

github.com/gocondor/gocondor/config => ./config
github.com/gocondor/gocondor/handlers => ./handlers
github.com/gocondor/gocondor/middlewares => ./middlewares
github.com/gocondor/gocondor/models => ./models
)
Note:
this is needed to tell go that instead of using the remote core package use the local copy where we will be making the changes, once you are done, open a PR to develop branch.