 Documentation
Documentation
Overview 
Package source holds all the assets for Statping. This includes CSS, JS, SCSS, HTML and other website related content. This package uses Rice to compile all assets into a single 'rice-box.go' file.
Required Dependencies 
- rice -> https://github.com/GeertJohan/go.rice - sass -> https://sass-lang.com/install
Compile Assets 
To compile all the HTML, JS, SCSS, CSS and image assets you'll need to have rice and sass installed on your local system.
sass source/scss/base.scss source/css/base.css
cd source && rice embed-go
More info on: https://github.com/statping/statping
Code generated by go generate; DO NOT EDIT. This file was generated by robots at 2020-02-01 06:06:45.83918 +0000 UTC
This contains the most recently Markdown source for the Statping Wiki.
Index 
- Variables
- func Assets() error
- func CompileSASS() error
- func CopyAllToPublic(box *rice.Box) error
- func CopyToPublic(box *rice.Box, path, file string) error
- func CreateAllAssets(folder string) error
- func DeleteAllAssets(folder string) error
- func MakePublicFolder(folder string) error
- func OpenAsset(path string) string
- func SaveAsset(data []byte, path string) error
- func UsingAssets(folder string) bool
Examples 
Constants 
This section is empty.
Variables 
var (
	TmplBox       *rice.Box // HTML and other small files from the 'source/dist' directory, this will be loaded into '/assets'
	RequiredFiles = []string{
		"css/style.css",
		"css/style.css.gz",
		"css/index.css",
		"scss/index.scss",
		"scss/base.scss",
		"scss/forms.scss",
		"scss/layout.scss",
		"scss/mixin.scss",
		"scss/mobile.scss",
		"scss/variables.scss",
		"banner.png",
		"favicon.ico",
		"robots.txt",
	}
)
var CompiledWiki = []byte("<a class=\"scrollclick\" href=\"#\" data-id=\"page_0\">Types of Monitoring</a><br><a class=\"scrollclick\" href=\"#\" data-id=\"page_1\">Features</a><br><a class=\"scrollclick\" href=\"#\" data-id=\"page_2\">Start Statping</a><br><a class=\"scrollclick\" href=\"#\" data-id=\"page_3\">Linux</a><br><a class=\"scrollclick\" href=\"#\" data-id=\"page_4\">Mac</a><br><a class=\"scrollclick\" href=\"#\" data-id=\"page_5\">Windows</a><br><a class=\"scrollclick\" href=\"#\" data-id=\"page_6\">AWS EC2</a><br><a class=\"scrollclick\" href=\"#\" data-id=\"page_7\">Docker</a><br><a class=\"scrollclick\" href=\"#\" data-id=\"page_8\">Mobile App</a><br><a class=\"scrollclick\" href=\"#\" data-id=\"page_9\">Heroku</a><br><a class=\"scrollclick\" href=\"#\" data-id=\"page_10\">API</a><br><a class=\"scrollclick\" href=\"#\" data-id=\"page_11\">Makefile</a><br><a class=\"scrollclick\" href=\"#\" data-id=\"page_12\">Notifiers</a><br><a class=\"scrollclick\" href=\"#\" data-id=\"page_13\">Notifier Events</a><br><a class=\"scrollclick\" href=\"#\" data-id=\"page_14\">Notifier Example</a><br><a class=\"scrollclick\" href=\"#\" data-id=\"page_15\">Prometheus Exporter</a><br><a class=\"scrollclick\" href=\"#\" data-id=\"page_16\">SSL</a><br><a class=\"scrollclick\" href=\"#\" data-id=\"page_17\">Config with .env File</a><br><a class=\"scrollclick\" href=\"#\" data-id=\"page_18\">Static Export</a><br><a class=\"scrollclick\" href=\"#\" data-id=\"page_19\">Statping Plugins</a><br><a class=\"scrollclick\" href=\"#\" data-id=\"page_20\">Statuper</a><br><a class=\"scrollclick\" href=\"#\" data-id=\"page_21\">Build and Test</a><br><a class=\"scrollclick\" href=\"#\" data-id=\"page_22\">Contributing</a><br><a class=\"scrollclick\" href=\"#\" data-id=\"page_23\">PGP Signature</a><br><a class=\"scrollclick\" href=\"#\" data-id=\"page_24\">Testing</a><br><a class=\"scrollclick\" href=\"#\" data-id=\"page_25\">Deployment</a><br>\n\n<div class=\"mt-5\" id=\"page_0\"><h1>Types of Monitoring</h1></div>\nYou can monitor your application by using a simple HTTP GET to the endpoint to return back a response and status code. Normally you want a 200 status code on an HTTP request. You might want to require a 404 or 500 error as a response code though. With each service you can include a Timeout in seconds to work with your long running services.\n\n# HTTP Endpoints with Custom POST\nFor more advanced monitoring you can add a data as a HTTP POST request. This is useful for automatically submitting JSON, or making sure your signup form is working correctly.\n\n<p align=\"center\">\n<img width=\"100%\" src=\"https://img.cjx.io/statup-httpservice.png\">\n</p>\n\nWith a HTTP service, you can POST a JSON string to your endpoint to retrieve any type of response back. You can then use Regex in the Expected Response field to parse a custom response that exactly matches your status requirements. \n\n# TCP/UDP Services\nFor other services that don't use HTTP, you can monitor any type of service by using the PORT of the service. If you're Ethereum Blockchain server is running on 8545, you can use TCP to monitor your server. With a TCP service, you can monitor your Docker containers, or remove service running on a custom port. You don't need to include `http` in the endpoint field, just IP or Hostname.\n\n<p align=\"center\">\n<img width=\"100%\" src=\"https://img.cjx.io/statup-tcpservice.png\">\n</p>\n\n# ICMP Service\nYou can send a [ICMP](https://en.wikipedia.org/wiki/Internet_Control_Message_Protocol) (ping) to an endpoint rather than HTTP/TCP/UDP request for a quick response.\n\n\n<div class=\"mt-5\" id=\"page_1\"><h1>Features</h1></div>\nStatping is a great Status Page that can be deployed with 0 effort.\n\n# 3 Different Databases\nYou can use MySQL, Postgres, or SQLite as a database for your Statping status page. The server will automatically upgrade your database tables depending on which database you have.\n\n# Easy to Startup\nStatping is an extremely easy to setup website monitoring tool without fussing with dependencies or packages. Simply download and install the precompile binary for your operating system. Statping works on Windows, Mac, Linux, Docker, and even the Raspberry Pi.\n\n# Plugins\nStatping is an awesome Status Page generator that allows you to create your own plugins with Golang Plugins! You don't need to request a PR or even tell us about your plugin. Plugin's are compiled and then send as a binary to the Statping `/plugins` folder. Test your plugins using the `statup test plugin` command, checkout the [Plugin Wiki](https://github.com/statping/statping/wiki/Statping-Plugins) to see detailed information about creating plugins.\n\n# No Maintenance\nMany other website monitoring applications will collect data until the server fails because of hard drive is 100% full. Statping will automatically delete records to make sure your server will stay UP for years. The EC2 AMI Image is a great way to host your status page without worrying about it crashing one day. Statping will automatically upgrade its software when you reboot your computer.\n\n# Email & Slack Notifications\nReceive email notifications if your website or application goes offline. Statping includes SMTP connections so you can use AWS SES, or any other SMTP emailing service. Go in the Email Settings in Settings to configure these options.\n\n# Prometheus Exporter\nIf you want a deeper view of your applications status, you can use Grafana and Prometheus to graph all types of data about your services. Read more about the [Prometheus Exporter](https://github.com/statping/statping/wiki/Prometheus-Exporter)\n\n<div class=\"mt-5\" id=\"page_2\"><h1>Start Statping</h1></div>\n\n\n<div class=\"mt-5\" id=\"page_3\"><h1>Linux</h1></div>\n# Installing on Linux\nInstalling Statping on Linux can be done by downloading the latest tar.gz file, unzipping, and running the executable. You can also install using [Snapcraft](https://snapcraft.io/) for Ubuntu systems.\n\n```shell\ncurl -o- -L https://statping.com/install.sh | bash\n```\n\n## Install using Snapcraft\n\n[](https://snapcraft.io/statping)\n\nIf you are using [snap](https://snapcraft.io/statping), you can simply run this command to install Statping.\n```shell\nsudo snap install statping\n```\n\n# Compiling SCSS for Custom Theme\nStatping requires `sass` to be installed to the local machine to compile SCSS into CSS if you want to use the Custom Theme features. \n\n- Apt: `apt install ruby-sass -y`\n- Node: `npm install sass -g`\n- Ruby: `gem install sass`\n\n## Systemd Service\nSetting up a systemd service is a great way to make sure your Statping server will automatically reboot when needed. You can use the file below for your service. You should have Statping already installed by this step.\n###### /etc/systemd/system/statping.service\n```\n[Unit]\nDescription=Statping Server\nAfter=network.target\nAfter=systemd-user-sessions.service\nAfter=network-online.target\n\n[Service]\nType=simple\nRestart=always\nExecStart=/usr/local/bin/statping\nWorkingDirectory=/usr/local/bin\n\n[Install]\nWantedBy=multi-user.target\n```\nThen you can enable and start your systemd service with:\n```\nsystemctl daemon-reload\n\nsystemctl enable statping.service\n\nsystemctl start statping\n```\nYou're Statping server will now automatically restart when your server restarts.\n\n## Raspberry Pi\nYou can even run Statping on your Raspberry Pi by installing the precompiled binary from [Latest Releases](https://github.com/statping/statping/releases/latest). For the Raspberry Pi 3 you'll want to download the `statping-linux-arm7.tar.gz` file. Be sure to change `VERSION` to the latest version in Releases, and include the 'v'.\n\n```\nVERSION=$(curl -s \"https://github.com/statping/statping/releases/latest\" | grep -o 'tag/[v.0-9]*' | awk -F/ '{print $2}')\nwget https://github.com/statping/statping/releases/download/$VERSION/statping-linux-arm7.tar.gz\ntar -xvzf statping-linux-arm7.tar.gz\nchmod +x statping\nmv statping /usr/local/bin/statping\n\nstatping version\n``` \n\n## Alpine Linux\nThe Docker image is using the Statping Alpine binary since it's so incredibly small. You can run it on your own alpine image by downloading `statping-linux-alpine.tar.gz` from [Latest Releases](https://github.com/statping/statping/releases/latest).\n\n<div class=\"mt-5\" id=\"page_4\"><h1>Mac</h1></div>\n# Installing on Mac\nStatping includes an easy to use [Homebrew Formula](https://github.com/hunterlong/homebrew-statping) to quick get your Status Page up and running locally. Statping on brew is automatically generated for each new release to master. Install with the commands below,\n###### Using Homebrew\n```bash\nbrew tap statping/statping\nbrew install statping\n```\n###### Using the Terminal\n```shell\ncurl -o- -L https://statping.com/install.sh | bash\n```\n\n<p align=\"center\">\n<img width=\"80%\" src=\"https://img.cjx.io/statupbrewinstall.gif\">\n</p>\n\nOnce you've installed it, checkout which version you have by running `statping version`.\n\n# Compiling SCSS for Custom Theme\nStatping requires `sass` to be installed to the local machine to compile SCSS into CSS if you want to use the Custom Theme features. \n\n- Node: `npm install sass -g`\n- Ruby: `gem install sass`\n\n\n<div class=\"mt-5\" id=\"page_5\"><h1>Windows</h1></div>\n# Installing on Windows\nCurrently, Statping only works on Windows 64-bit computers. Just download the exe file from [Latest Releases](https://github.com/statping/statping/releases/latest) and run it in your command prompt. It will create a HTTP server on port 8080, so you can visit `http://localhost:8080` to see your Statping Status Page.\n\n# Compiling SCSS for Custom Theme\nStatping requires `sass` to be installed to the local machine to compile SCSS into CSS if you want to use the Custom Theme features. \n\n- Node: `npm install sass -g`\n- Ruby: `gem install sass`\n\n# Running Statping as a Service\nTo ensure Statping is always running, it can be installed to run as a service on a Windows machine. The easiest way to do that is by using NSSM, the [Non-Sucking Service Manager](https://nssm.cc/download). Download and unzip the compressed file to a location on your machine running Statping to get started:\n1. Open an administrative command prompt.\n2. Change to the folder that contains the 64 bit version of NSSM.\n3. Type \"nssm install Statping\" and press enter.\n4. For the properties, use the following as an example:\n Path: C:\\Program Files\\Statping\\statping.exe\n Startup directory: C:\\Program Files\\Statping\n5. Click \"Install\".\n6. Launch the windows services manager.\n7. Run Statping.\n\n## Known Issues with Windows\nUnfortunately, Statping only works on Windows 64-bit processors. If you have more than 4gb of ram, there's a good chance you already have a 64-bit processor. Download the [Latest Releases](https://github.com/statping/statping/releases/latest) of Statping, extract the ZIP file, then double click on the `statping.exe` file. You can use a SQLite database for a quick setup, or connect to a local/remote Postgres or MySQL database server.\n\n<div class=\"mt-5\" id=\"page_6\"><h1>AWS EC2</h1></div>\nRunning Statping on the smallest EC2 server is very quick using the AWS AMI Image. The AWS AMI Image will automatically start a Statping Docker container that will automatically update to the latest version. Once the EC2 is booted, you can go to the Public DNS domain to view the Statping installation page. The Statping root folder is located at: `/statping` on the server.\n\n# AMI Image\nChoose the correct AMI Image ID based on your AWS region.\n- us-east-1 `ami-09ccd23d9c7afba61` (Virginia)\n- us-east-2 `ami-0c6c9b714a501cdb3` (Ohio)\n- us-west-1 `ami-02159cc1fc701a77e` (California)\n- us-west-2 `ami-007c6990949f5ccee` (Oregon)\n- eu-central-1 `ami-06e252d6d8b0c2f1f` (Frankfurt)\n\n# Upgrading Staping\nYou can upgrade the Statping executable by running the commands below on your EC2 instance.\n```\nVERSION=$(curl -s \"https://github.com/statping/statping/releases/latest\" | grep -o 'tag/[v.0-9]*' | awk -F/ '{print $2}')\nwget https://github.com/statping/statping/releases/download/$VERSION/statping-linux-x64.tar.gz\ntar -xvzf statping-linux-x64.tar.gz\nchmod +x statping\nmv statping /usr/local/bin/statping\n```\nYou can test the version number by running `statping version`.\n\n# Instructions\n\n### 1. Create an EC2 instance from AMI Image\nGo to the main EC2 dashboard and click 'Launch Instance'. Then type `Statping` inside the search field for 'Community AMI'. Once you've found it in your region, click Select!\n\n<img src=\"https://img.cjx.io/statpingaws-ami.png\">\n\n### 2. Get the Public DNS for EC2 Instance\nCopy the 'Public DNS' URL and paste it into your browser.\n\n<img src=\"https://img.cjx.io/statping-aws-ec2.png\">\n\n### 3. Setup Statping\nUse SQLite if you don't want to connect to a remote MySQL or Postgres database.\n\n<img src=\"https://img.cjx.io/statping-setup.png\">\n\n# EC2 Server Features\nRunning your Statping server on a small EC2 instance is perfect for most users. Below you'll find some commands to get up and running in seconds.\n- Super cheap on the t2.nano (~$4.60 monthly)\n- Small usage, 8gb of hard drive\n- Automatic SSL certificate if you require it\n- Automatic reboot when the server needs it\n- Automatic database cleanup, so you'll never be at 100% full.\n- Automatic docker containers/images removal\n\n## Create Security Groups\nUsing the AWS CLI you can copy and paste the commands below to auto create everything for you. The server opens port 80 and 443.\n```bash\naws ec2 create-security-group --group-name StatpingPublicHTTP --description \"Statping HTTP Server on port 80 and 443\"\n# will response back a Group ID. Copy ID and use it for --group-id below.\n```\n```bash\nGROUPS=sg-7e8b830f\naws ec2 authorize-security-group-ingress --group-id $GROUPS --protocol tcp --port 80 --cidr 0.0.0.0/0\naws ec2 authorize-security-group-ingress --group-id $GROUPS --protocol tcp --port 443 --cidr 0.0.0.0/0\n```\n## Create EC2 without SSL\nOnce your server has started, go to the EC2 Public DNS endpoint. You should be redirected to /setup to continue your installation process! The database information is already inputed for you.\n```bash\nGROUPS=sg-7e8b830f\nKEY=MYKEYHERE\nAMI_IMAGE=ami-7be8a103\n\naws ec2 run-instances \\\n --image-id $AMI_IMAGE \\\n --count 1 --instance-type t2.nano \\\n --key-name $KEY \\\n --security-group-ids $GROUPS\n```\n## Create EC2 with Automatic SSL Certification\nStart a Statping server with an SSL cert that will automatically regenerate when it's near expiration time. You'll need to point your domain's A record (IP address) or CNAME (public DNS endpoint) to use this feature.\n\n```bash\nwget https://raw.githubusercontent.com/hunterlong/statping/master/dev/ec2-ssl.sh\n```\n\n```bash\n# edit the contents inside of ec2-ssl.sh then continue\nLETSENCRYPT_HOST=\"status.MYDOMAIN.com\"\nLETSENCRYPT_EMAIL=\"noreply@MYEMAIL.com\"\n```\nEdit ec2-ssl.sh and insert your domain you want to use, then run command below. Use the Security Group ID that you used above for --security-group-ids\n```\nGROUPS=sg-7e8b830f\nAMI_IMAGE=ami-7be8a103\nKEY=MYKEYHERE\n\naws ec2 run-instances \\\n --user-data file://ec2-ssl.sh \\\n --image-id $AMI_IMAGE \\\n --count 1 --instance-type t2.nano \\\n --key-name $KEY \\\n --security-group-ids $GROUPS\n```\n\n### EC2 Server Specs\n- t2.nano ($4.60 monthly)\n- 8gb SSD Memory\n- 0.5gb RAM\n- Docker with Docker Compose installed\n- Running Statping, NGINX, and Postgres\n- boot scripts to automatically clean unused containers.\n\n\n\n<div class=\"mt-5\" id=\"page_7\"><h1>Docker</h1></div>\nStatping is easily ran on Docker with the light weight Alpine linux image. View on [Docker Hub](https://hub.docker.com/r/hunterlong/statping).\n\n[](https://microbadger.com/images/hunterlong/statping) [](https://hub.docker.com/r/hunterlong/statping/builds/)\n\n# Latest Docker Image\nThe `latest` Docker image uses Alpine Linux to keep it ultra small.\n```bash\ndocker run -d \\\n -p 8080:8080 \\\n --restart always \\\n hunterlong/statping\n```\n\n# Mounting Volume\nYou can mount a volume to the `/app` Statping directory. This folder will contain `logs`, `config.yml`, and static assets if you want to edit the SCSS/CSS. \n```bash\ndocker run -d \\\n -p 8080:8080 \\\n -v /mydir/statping:/app \\\n --restart always \\\n hunterlong/statping\n```\n\n# Attach a SSL Certificate\nWhen you mount `server.crt` and `server.key` to the `/app` directory, Statping will run a HTTPS server on port 443. Checkout the [SSL Wiki](https://github.com/statping/statping/wiki/SSL) documentation to see more information about this.\n```bash\ndocker run -d \\\n -p 443:443 \\\n -v /mydir/domain.crt:/app/server.crt \\\n -v /mydir/domain.key:/app/server.key \\\n -v /mydir:/app \\\n --restart always \\\n hunterlong/statping\n```\n\n# Development Docker Image\nIf you want to run Statping that was build from the source, use the `dev` Docker image.\n```bash\ndocker run -d -p 8080:8080 hunterlong/statping:dev\n```\n\n# Cypress Testing Docker Image\nThis Docker image will pull the latest version of Statping and test the web interface with [Cypress](https://www.cypress.io/).\n```bash\ndocker run -it -p 8080:8080 hunterlong/statping:cypress\n```\n\n#### Or use Docker Compose\nThis Docker Compose file inlcudes NGINX, Postgres, and Statping.\n\n### Docker Compose with NGINX and Postgres\nOnce you initiate the `docker-compose.yml` file below go to http://localhost and you'll be forwarded to the /setup page. \nDatabase Authentication\n- database: `postgres`\n- port: `5432`\n- username: `statup`\n- password: `password123`\n- database: `statup`\n\n```yaml\nversion: '2.3'\n\nservices:\n\n nginx:\n container_name: nginx\n image: jwilder/nginx-proxy\n ports:\n - 0.0.0.0:80:80\n - 0.0.0.0:443:443\n networks:\n - internet\n restart: always\n volumes:\n - /var/run/docker.sock:/tmp/docker.sock:ro\n - ./statup/nginx/certs:/etc/nginx/certs:ro\n - ./statup/nginx/vhost:/etc/nginx/vhost.d\n - ./statup/nginx/html:/usr/share/nginx/html:ro\n - ./statup/nginx/dhparam:/etc/nginx/dhparam\n environment:\n DEFAULT_HOST: localhost\n\n statup:\n container_name: statup\n image: hunterlong/statping:latest\n restart: always\n networks:\n - internet\n - database\n depends_on:\n - postgres\n volumes:\n - ./statup/app:/app\n environment:\n VIRTUAL_HOST: localhost\n VIRTUAL_PORT: 8080\n DB_CONN: postgres\n DB_HOST: postgres\n DB_USER: statup\n DB_PASS: password123\n DB_DATABASE: statup\n NAME: EC2 Example\n DESCRIPTION: This is a Statping Docker Compose instance\n\n postgres:\n container_name: postgres\n image: postgres:10\n restart: always\n networks:\n - database\n volumes:\n - ./statup/postgres:/var/lib/postgresql/data\n environment:\n POSTGRES_PASSWORD: password123\n POSTGRES_USER: statup\n POSTGRES_DB: statup\n\nnetworks:\n internet:\n driver: bridge\n database:\n driver: bridge\n```\nOr a simple wget...\n```bash\nwget https://raw.githubusercontent.com/hunterlong/statping/master/servers/docker-compose.yml\ndocker-compose up -d\n```\n\n### Docker Compose with Automatic SSL\nYou can automatically start a Statping server with automatic SSL encryption using this docker-compose file. First point your domain's DNS to the Statping server, and then run this docker-compose command with DOMAIN and EMAIL. Email is for letsencrypt services.\n```bash\nwget https://raw.githubusercontent.com/hunterlong/statping/master/servers/docker-compose-ssl.yml\n\nLETSENCRYPT_HOST=mydomain.com \\\n LETSENCRYPT_EMAIL=info@mydomain.com \\\n docker-compose -f docker-compose-ssl.yml up -d\n```\n\n#### Full docker-compose with Automatic SSL\n\n```yaml\nversion: '2.3'\n\nservices:\n\n nginx:\n container_name: nginx\n image: jwilder/nginx-proxy\n ports:\n - 0.0.0.0:80:80\n - 0.0.0.0:443:443\n labels:\n - \"com.github.jrcs.letsencrypt_nginx_proxy_companion.nginx_proxy\"\n networks:\n - internet\n restart: always\n volumes:\n - /var/run/docker.sock:/tmp/docker.sock:ro\n - ./statup/nginx/certs:/etc/nginx/certs:ro\n - ./statup/nginx/vhost:/etc/nginx/vhost.d\n - ./statup/nginx/html:/usr/share/nginx/html:ro\n - ./statup/nginx/dhparam:/etc/nginx/dhparam\n environment:\n DEFAULT_HOST: ${LETSENCRYPT_HOST}\n\n letsencrypt:\n container_name: letsencrypt\n image: jrcs/letsencrypt-nginx-proxy-companion\n networks:\n - internet\n restart: always\n volumes:\n - /var/run/docker.sock:/var/run/docker.sock:ro\n - ./statup/nginx/certs:/etc/nginx/certs\n - ./statup/nginx/vhost:/etc/nginx/vhost.d\n - ./statup/nginx/html:/usr/share/nginx/html\n - ./statup/nginx/dhparam:/etc/nginx/dhparam\n\n statup:\n container_name: statup\n image: hunterlong/statping:latest\n restart: always\n networks:\n - internet\n - database\n depends_on:\n - postgres\n volumes:\n - ./statup/app:/app\n environment:\n VIRTUAL_HOST: ${LETSENCRYPT_HOST}\n VIRTUAL_PORT: 8080\n LETSENCRYPT_HOST: ${LETSENCRYPT_HOST}\n LETSENCRYPT_EMAIL: ${LETSENCRYPT_EMAIL}\n DB_CONN: postgres\n DB_HOST: postgres\n DB_USER: statup\n DB_PASS: password123\n DB_DATABASE: statup\n NAME: SSL Example\n DESCRIPTION: This Status Status Page should be running ${LETSENCRYPT_HOST} with SSL.\n\n postgres:\n container_name: postgres\n image: postgres:10\n restart: always\n networks:\n - database\n volumes:\n - ./statup/postgres:/var/lib/postgresql/data\n environment:\n POSTGRES_PASSWORD: password123\n POSTGRES_USER: statup\n POSTGRES_DB: statup\n\nnetworks:\n internet:\n driver: bridge\n database:\n driver: bridge\n```\n\n<div class=\"mt-5\" id=\"page_8\"><h1>Mobile App</h1></div>\nStatping has a free mobile app so you can monitor your websites and applications without the need of a computer. \n\n\n\n<p align=\"center\">\n<a href=\"https://play.google.com/store/apps/details?id=com.statping\"><img src=\"https://img.cjx.io/google-play.svg\"></a>\n<a href=\"https://itunes.apple.com/us/app/apple-store/id1445513219\"><img src=\"https://img.cjx.io/app-store-badge.svg\"></a>\n</p>\n\n<p align=\"center\">\n<img src=\"https://img.cjx.io/statping_iphone_bk.png\">\n</p>\n\n\n<div class=\"mt-5\" id=\"page_9\"><h1>Heroku</h1></div>\nYou can now instantly deploy your Statping instance on a free Heroku container. Simply click the deploy button below and get up in running within seconds. This Heroku deployment is based on the Statping Docker image so you will have all the great features including SASS and all the notifiers without any setup. \n\n[](https://heroku.com/deploy?template=https://github.com/statping/statping/tree/master)\n\nView the live Heroku Statping instance at: [https://statping.herokuapp.com](https://statping.herokuapp.com)\n\n# Database Configuration\nYou will need to deploy a Postgres database to your instance and insert some configuration variables. View the image below to see what environment variable you need to configure. If you insert `DB_CONN`, Statping will attempt to automatically connect to the database without the need for the `config.yml` file. \n\n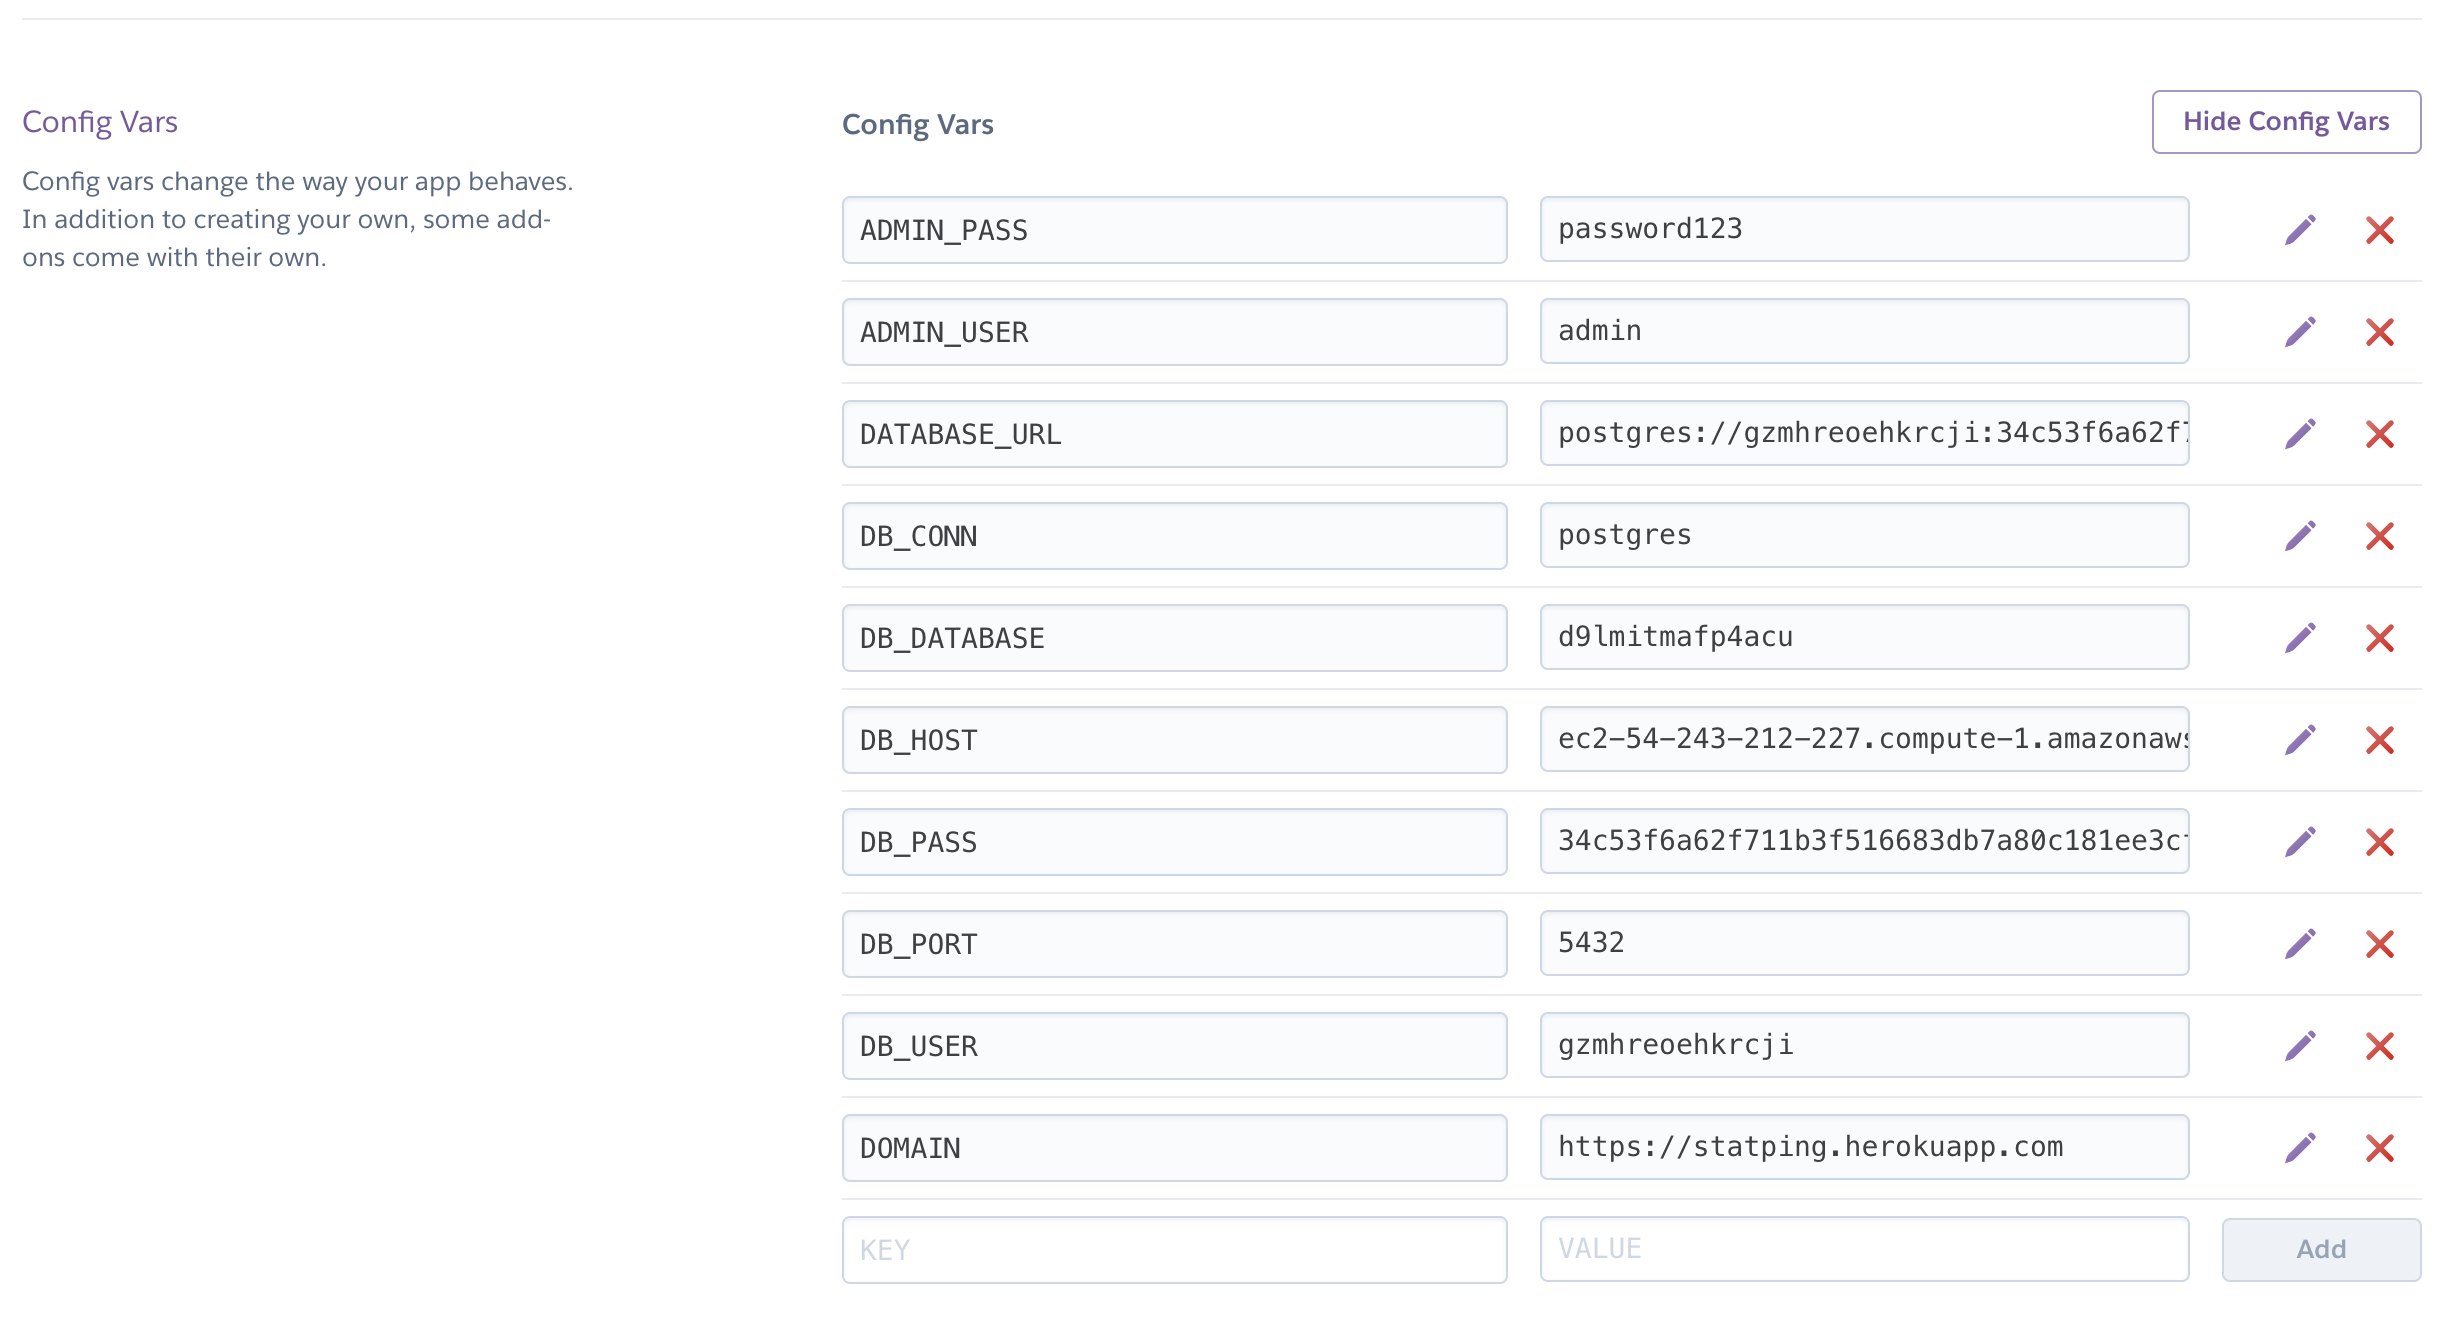\n\n\n<div class=\"mt-5\" id=\"page_10\"><h1>API</h1></div>\nStatping includes a RESTFUL API so you can view, update, and edit your services with easy to use routes. You can currently view, update and delete services, view, create, update users, and get detailed information about the Statping instance. To make life easy, try out a Postman or Swagger JSON file and use it on your Statping Server.\n\n<p align=\"center\">\n<a href=\"https://documenter.getpostman.com/view/1898229/RzfiJUd6\">Postman</a> | <a href=\"https://github.com/statping/statping/blob/master/dev/postman.json\">Postman JSON Export</a> | <a href=\"https://github.com/statping/statping/blob/master/dev/swagger.json\">Swagger Export</a>\n</p>\n\n## Authentication\nAuthentication uses the Statping API Secret to accept remote requests. You can find the API Secret in the Settings page of your Statping server. To send requests to your Statping API, include a Authorization Header when you send the request. The API will accept any one of the headers below.\n\n- HTTP Header: `Authorization: API SECRET HERE`\n- HTTP Header: `Authorization: Bearer API SECRET HERE`\n\n## Main Route `/api`\nThe main API route will show you all services and failures along with them.\n\n## Services\nThe services API endpoint will show you detailed information about services and will allow you to edit/delete services with POST/DELETE http methods.\n\n### Viewing All Services\n- Endpoint: `/api/services`\n- Method: `GET`\n- Response: Array of [Services](https://github.com/statping/statping/wiki/API#service-response)\n- Response Type: `application/json`\n- Request Type: `application/json`\n\n### Viewing Service\n- Endpoint: `/api/services/{id}`\n- Method: `GET`\n- Response: [Service](https://github.com/statping/statping/wiki/API#service-response)\n- Response Type: `application/json`\n- Request Type: `application/json`\n\n### Updating Service\n- Endpoint: `/api/services/{id}`\n- Method: `POST`\n- Response: [Service](https://github.com/statping/statping/wiki/API#service-response)\n- Response Type: `application/json`\n- Request Type: `application/json`\n\nPOST Data:\n```json\n{\n \"name\": \"Updated Service\",\n \"domain\": \"https://google.com\",\n \"expected\": \"\",\n \"expected_status\": 200,\n \"check_interval\": 15,\n \"type\": \"http\",\n \"method\": \"GET\",\n \"post_data\": \"\",\n \"port\": 0,\n \"timeout\": 10,\n \"order_id\": 0\n}\n```\n\n### Create New Service\n- Endpoint: `/api/services`\n- Method: `POST`\n- Response: [Service](https://github.com/statping/statping/wiki/API#service-response)\n- Response Type: `application/json`\n- Request Type: `application/json`\n\nPOST Data:\n```json\n{\n \"name\": \"Create New Service\",\n \"domain\": \"https://www.coogger.com\",\n \"expected\": \"\",\n \"expected_status\": 200,\n \"check_interval\": 15,\n \"type\": \"http\",\n \"method\": \"GET\",\n \"post_data\": \"\",\n \"port\": 0,\n \"timeout\": 10,\n \"order_id\": 0\n}\n```\n\n### Deleting Service\n- Endpoint: `/api/services/{id}`\n- Method: `DELETE`\n- Response: [Object Response](https://github.com/statping/statping/wiki/API#object-response)\n- Response Type: `application/json`\n- Request Type: `application/json`\n\nResponse:\n```json\n{\n \"status\": \"success\",\n \"id\": 4,\n \"type\": \"service\",\n \"method\": \"delete\"\n}\n```\n\n## Users\nThe users API endpoint will show you users that are registered inside your Statping instance.\n\n### View All Users\n- Endpoint: `/api/users`\n- Method: `GET`\n- Response: Array of [Users](https://github.com/statping/statping/wiki/API#user-response)\n- Response Type: `application/json`\n- Request Type: `application/json`\n\n### Viewing User\n- Endpoint: `/api/users/{id}`\n- Method: `GET`\n- Response: [User](https://github.com/statping/statping/wiki/API#user-response)\n- Response Type: `application/json`\n- Request Type: `application/json`\n\n### Creating New User\n- Endpoint: `/api/users`\n- Method: `POST`\n- Response: [User](https://github.com/statping/statping/wiki/API#user-response)\n- Response Type: `application/json`\n- Request Type: `application/json`\n\nPOST Data:\n```json\n{\n \"username\": \"newadmin\",\n \"email\": \"info@email.com\",\n \"password\": \"password123\",\n \"admin\": true\n}\n```\n\n### Updating User\n- Endpoint: `/api/users/{id}`\n- Method: `POST`\n- Response: [User](https://github.com/statping/statping/wiki/API#user-response)\n- Response Type: `application/json`\n- Request Type: `application/json`\n\nPOST Data:\n```json\n{\n \"username\": \"updatedadmin\",\n \"email\": \"info@email.com\",\n \"password\": \"password123\",\n \"admin\": true\n}\n```\n\n### Deleting User\n- Endpoint: `/api/services/{id}`\n- Method: `DELETE`\n- Response: [Object Response](https://github.com/statping/statping/wiki/API#object-response)\n- Response Type: `application/json`\n- Request Type: `application/json`\n\nResponse:\n```json\n{\n \"status\": \"success\",\n \"id\": 3,\n \"type\": \"user\",\n \"method\": \"delete\"\n}\n```\n\n# Service Response\n```json\n{\n \"id\": 8,\n \"name\": \"Test Service 0\",\n \"domain\": \"https://status.coinapp.io\",\n \"expected\": \"\",\n \"expected_status\": 200,\n \"check_interval\": 1,\n \"type\": \"http\",\n \"method\": \"GET\",\n \"post_data\": \"\",\n \"port\": 0,\n \"timeout\": 30,\n \"order_id\": 0,\n \"created_at\": \"2018-09-12T09:07:03.045832088-07:00\",\n \"updated_at\": \"2018-09-12T09:07:03.046114305-07:00\",\n \"online\": false,\n \"latency\": 0.031411064,\n \"24_hours_online\": 0,\n \"avg_response\": \"\",\n \"status_code\": 502,\n \"last_online\": \"0001-01-01T00:00:00Z\",\n \"dns_lookup_time\": 0.001727175,\n \"failures\": [\n {\n \"id\": 5187,\n \"issue\": \"HTTP Status Code 502 did not match 200\",\n \"created_at\": \"2018-09-12T10:41:46.292277471-07:00\"\n },\n {\n \"id\": 5188,\n \"issue\": \"HTTP Status Code 502 did not match 200\",\n \"created_at\": \"2018-09-12T10:41:47.337659862-07:00\"\n }\n ]\n}\n```\n\n# User Response\n```json\n{\n \"id\": 1,\n \"username\": \"admin\",\n \"api_key\": \"02f324450a631980121e8fd6ea7dfe4a7c685a2f\",\n \"admin\": true,\n \"created_at\": \"2018-09-12T09:06:53.906398511-07:00\",\n \"updated_at\": \"2018-09-12T09:06:54.972440207-07:00\"\n}\n```\n\n# Object Response\n```json\n{\n \"type\": \"service\",\n \"id\": 19,\n \"method\": \"delete\",\n \"status\": \"success\"\n}\n```\n\n# Main API Response\n```json\n{\n \"name\": \"Awesome Status\",\n \"description\": \"An awesome status page by Statping\",\n \"footer\": \"This is my custom footer\",\n \"domain\": \"https://demo.statping.com\",\n \"version\": \"v0.56\",\n \"migration_id\": 1536768413,\n \"created_at\": \"2018-09-12T09:06:53.905374829-07:00\",\n \"updated_at\": \"2018-09-12T09:07:01.654201225-07:00\",\n \"database\": \"sqlite\",\n \"started_on\": \"2018-09-12T10:43:07.760729349-07:00\",\n \"services\": [\n {\n \"id\": 1,\n \"name\": \"Google\",\n \"domain\": \"https://google.com\",\n \"expected\": \"\",\n \"expected_status\": 200,\n \"check_interval\": 10,\n \"type\": \"http\",\n \"method\": \"GET\",\n \"post_data\": \"\",\n \"port\": 0,\n \"timeout\": 10,\n \"order_id\": 0,\n \"created_at\": \"2018-09-12T09:06:54.97549122-07:00\",\n \"updated_at\": \"2018-09-12T09:06:54.975624103-07:00\",\n \"online\": true,\n \"latency\": 0.09080986,\n \"24_hours_online\": 0,\n \"avg_response\": \"\",\n \"status_code\": 200,\n \"last_online\": \"2018-09-12T10:44:07.931990439-07:00\",\n \"dns_lookup_time\": 0.005543935\n }\n ]\n}\n```\n\n\n<div class=\"mt-5\" id=\"page_11\"><h1>Makefile</h1></div>\nHere's a simple list of Makefile commands you can run using `make`. The [Makefile](https://github.com/statping/statping/blob/master/Makefile) may change often, so i'll try to keep this Wiki up-to-date.\n\n- Ubuntu `apt-get install build-essential`\n- MacOSX `sudo xcode-select -switch /Applications/Xcode.app/Contents/Developer`\n- Windows [Install Guide for GNU make utility](http://gnuwin32.sourceforge.net/packages/make.htm)\n- CentOS/RedHat `yum groupinstall \"Development Tools\"`\n\n### Commands\n```bash\nmake build # build the binary\nmake install\nmake run\nmake test\nmake coverage\nmake docs\n# Building Statping\nmake build-all\nmake build-alpine\nmake docker\nmake docker-run\nmake docker-dev\nmake docker-run-dev\nmake databases\nmake dev-deps\nmake clean\nmake compress\nmake cypress-install\nmake cypress-test\n```\n\n<div class=\"mt-5\" id=\"page_12\"><h1>Notifiers</h1></div>\n<p align=\"center\">\n<img width=\"80%\" src=\"https://s3-us-west-2.amazonaws.com/gitimgs/statupnotifiers.png\">\n</p>\n\nStatping includes multiple Notifiers to alert you when your services are offline. You can also create your own notifier and send a Push Request to this repo! Creating a custom notifier is pretty easy as long as you follow the requirements. A notifier will automatically be installed into the users Statping database, and form values will save without any hassles. 💃\n\n<p align=\"center\">\n<a href=\"https://github.com/statping/statping/wiki/Notifier-Example\">Example Code</a> | <a href=\"https://github.com/statping/statping/wiki/Notifier-Events\">Events</a> | <a href=\"https://github.com/statping/statping/tree/master/notifiers\">View Notifiers</a><br>\n<a href=\"https://godoc.org/github.com/statping/statping/core/notifier\"><img src=\"https://godoc.org/github.com/golang/gddo?status.svg\"></a>\n</p>\n\n## Notifier Requirements\n- Must have a unique `METHOD` name\n- Struct must have `*notifier.Notification` pointer in it. \n- Must create and add your notifier variable in `init()`\n- Should have a form for user to input their variables/keys. `Form: []notifier.NotificationForm`\n\n## Notifier Interface (required)\nStatping has the `Notifier` interface which you'll need to include in your notifier. Statping includes many other events/triggers for your notifier, checkout <a href=\"https://github.com/statping/statping/wiki/Notifier-Events\">Notifier Events</a> to see all of them.\n```go\n// Notifier interface is required to create a new Notifier\ntype Notifier interface {\n\tOnSave() error // OnSave is triggered when the notifier is saved\n\tSend(interface{}) error // OnSave is triggered when the notifier is saved\n\tSelect() *Notification // Select returns the *Notification for a notifier\n}\n```\n\n### Basic Interface (required)\nInclude `OnSuccess` and `OnFailure` to receive events when a service is online or offline.\n```go\n// BasicEvents includes the most minimal events, failing and successful service triggers\ntype BasicEvents interface {\n\t// OnSuccess is triggered when a service is successful\n\tOnSuccess(*services.Service)\n\t// OnFailure is triggered when a service is failing\n\tOnFailure(*services.Service, *types.Failure)\n}\n```\n\n### Test Interface\nThe OnTest method will give the front end user the ability to test your notifier without saving, the OnTest method for your notifier run the functionality to test the user's submitted parameters and respond an error if notifier is not correctly setup.\n```go\n// Tester interface will include a function to Test users settings before saving\ntype Tester interface {\n\tOnTest() error\n}\n```\nIf your notifier includes this interface, the Test button will appear.\n\n## Notifier Struct\n```go\nvar example = &Example{¬ifier.Notification{\n\tMethod: \"example\", // unique method name\n\tHost: \"http://exmaplehost.com\", // default 'host' field\n\tForm: []notifier.NotificationForm{{\n\t\tType: \"text\", // text, password, number, or email\n\t\tTitle: \"Host\", // The title of value in form\n\t\tPlaceholder: \"Insert your Host here.\", // Optional placeholder in input\n\t\tDbField: \"host\", // An accepted DbField value (read below)\n\t}},\n}\n```\n\n## Notifier Form\nInclude a form with your notifier so other users can save API keys, username, passwords, and other values. \n```go\n// NotificationForm contains the HTML fields for each variable/input you want the notifier to accept.\ntype NotificationForm struct {\n\tType string `json:\"type\"` // the html input type (text, password, email)\n\tTitle string `json:\"title\"` // include a title for ease of use\n\tPlaceholder string `json:\"placeholder\"` // add a placeholder for the input\n\tDbField string `json:\"field\"` // true variable key for input\n\tSmallText string `json:\"small_text\"` // insert small text under a html input\n\tRequired bool `json:\"required\"` // require this input on the html form\n\tIsHidden bool `json:\"hidden\"` // hide this form element from end user\n\tIsList bool `json:\"list\"` // make this form element a comma separated list\n\tIsSwitch bool `json:\"switch\"` // make the notifier a boolean true/false switch\n}\n```\n\n### Example Notifier Form\nThis is the Slack Notifier `Form` fields.\n```go\nForm: []notifier.NotificationForm{{\n\t\tType: \"text\",\n\t\tTitle: \"Incoming webhooker Url\",\n\t\tPlaceholder: \"Insert your slack webhook URL here.\",\n\t\tSmallText: \"Incoming webhooker URL from <a href=\\\"https://api.slack.com/apps\\\" target=\\\"_blank\\\">slack Apps</a>\",\n\t\tDbField: \"Host\",\n\t\tRequired: true,\n\t}}\n}\n```\n\n### Accepted DbField Values\nThe `notifier.NotificationForm` has a field called `DbField` which is the column to save the value into the database. Below are the acceptable DbField string names to include in your form. \n- `host` used for a URL or API endpoint\n- `username` used for a username\n- `password` used for a password\n- `port` used for a integer port number\n- `api_key` used for some kind of API key\n- `api_secret` used for some API secret\n- `var1` used for any type of string\n- `var2` used for any type of string (extra)\n\n### Form Elements\nYou can completely custom your notifications to include a detailed form. \n- `Type` is a HTML input type for your field\n- `Title` give your input element a title\n- `Placeholder` optional field if you want a placeholder in input\n- `DbField` required field to save variable into database (read above)\n- `Placeholder` optional field for inserting small hint under the input\n\n# Adding Notifiers\nTo add a notifier to the Statping application, simply append your Notifier in the `AttachNotifiers()` function inside of [core/core.go](https://github.com/statping/statping/blob/master/core/core.go).\n\n```go\n// AttachNotifiers will attach all the notifier's into the system\nfunc AttachNotifiers() error {\n\treturn notifier.AddNotifiers(\n\t\tnotifiers.Command,\n\t\tnotifiers.Discorder,\n\t\tnotifiers.Emailer,\n\t\tnotifiers.LineNotify,\n\t\tnotifiers.Mobile,\n\t\tnotifiers.Slacker,\n\t\tnotifiers.Telegram,\n\t\tnotifiers.Twilio,\n\t\tnotifiers.Webhook,\n\t)\n}\n```\n###### [AttachNotifiers](https://github.com/statping/statping/blob/master/core/core.go#L183)\n\n<div class=\"mt-5\" id=\"page_13\"><h1>Notifier Events</h1></div>\nEvents are handled by added interfaces for the elements you want to monitor.\n\n## Required Notifier Interface\n```go\n// Notifier interface is required to create a new Notifier\ntype Notifier interface {\n\t// Run will trigger inside of the notifier when enabled\n\tRun() error\n\t// OnSave is triggered when the notifier is saved\n\tOnSave() error\n\t// Test will run a function inside the notifier to Test if it works\n\tTest() error\n\t// Select returns the *Notification for a notifier\n\tSelect() *Notification\n}\n```\n\n## Basic Success/Failure Interface\n```go\n// BasicEvents includes the most minimal events, failing and successful service triggers\ntype BasicEvents interface {\n\t// OnSuccess is triggered when a service is successful\n\tOnSuccess(*services.Service)\n\t// OnFailure is triggered when a service is failing\n\tOnFailure(*services.Service, *types.Failure)\n}\n```\n\n\n## Service Events\n```go\n// ServiceEvents are events for Services\ntype ServiceEvents interface {\n\tOnNewService(*services.Service)\n\tOnUpdatedService(*services.Service)\n\tOnDeletedService(*services.Service)\n}\n```\n\n## User Events\n```go\n// UserEvents are events for Users\ntype UserEvents interface {\n\tOnNewUser(*types.User)\n\tOnUpdatedUser(*types.User)\n\tOnDeletedUser(*types.User)\n}\n```\n\n## Core Events\n```go\n// CoreEvents are events for the main Core app\ntype CoreEvents interface {\n\tOnUpdatedCore(*types.Core)\n}\n```\n\n## Notifier Events\n```go\n// NotifierEvents are events for other Notifiers\ntype NotifierEvents interface {\n\tOnNewNotifier(*Notification)\n\tOnUpdatedNotifier(*Notification)\n}\n```\n\n<div class=\"mt-5\" id=\"page_14\"><h1>Notifier Example</h1></div>\nBelow is a full example of a Statping notifier which will give you a good example of how to create your own. Insert your new notifier inside the `/notifiers` folder once your ready!\n\n```go\npackage notifiers\n\nimport (\n\t\"errors\"\n\t\"fmt\"\n\t\"github.com/statping/statping/types\"\n \"github.com/statping/statping/core/notifier\"\n\t\"time\"\n)\n\ntype Example struct {\n\t*notifier.Notification\n}\n\nvar example = &Example{¬ifier.Notification{\n\tMethod: METHOD,\n\tTitle: \"Example\",\n\tDescription: \"Example Notifier\",\n\tAuthor: \"Hunter Long\",\n\tAuthorUrl: \"https://github.com/hunterlong\",\n\tDelay: time.Duration(5 * time.Second),\n\tForm: []notifier.NotificationForm{{\n\t\tType: \"text\",\n\t\tTitle: \"Host\",\n\t\tPlaceholder: \"Insert your Host here.\",\n\t\tDbField: \"host\",\n\t\tSmallText: \"this is where you would put the host\",\n\t}, {\n\t\tType: \"text\",\n\t\tTitle: \"Username\",\n\t\tPlaceholder: \"Insert your Username here.\",\n\t\tDbField: \"username\",\n\t}, {\n\t\tType: \"password\",\n\t\tTitle: \"Password\",\n\t\tPlaceholder: \"Insert your Password here.\",\n\t\tDbField: \"password\",\n\t}, {\n\t\tType: \"number\",\n\t\tTitle: \"Port\",\n\t\tPlaceholder: \"Insert your Port here.\",\n\t\tDbField: \"port\",\n\t}, {\n\t\tType: \"text\",\n\t\tTitle: \"API Key\",\n\t\tPlaceholder: \"Insert your API Key here\",\n\t\tDbField: \"api_key\",\n\t}, {\n\t\tType: \"text\",\n\t\tTitle: \"API Secret\",\n\t\tPlaceholder: \"Insert your API Secret here\",\n\t\tDbField: \"api_secret\",\n\t}, {\n\t\tType: \"text\",\n\t\tTitle: \"Var 1\",\n\t\tPlaceholder: \"Insert your Var1 here\",\n\t\tDbField: \"var1\",\n\t}, {\n\t\tType: \"text\",\n\t\tTitle: \"Var2\",\n\t\tPlaceholder: \"Var2 goes here\",\n\t\tDbField: \"var2\",\n\t}},\n}}\n\n// REQUIRED init() will install/load the notifier\nfunc init() {\n\tnotifier.AddNotifier(example)\n}\n\n// REQUIRED - Send is where you would put the action's of your notifier\nfunc (n *Example) Send(msg interface{}) error {\n\tmessage := msg.(string)\n\tfmt.Printf(\"i received this string: %v\\n\", message)\n\treturn nil\n}\n\n// REQUIRED\nfunc (n *Example) Select() *notifier.Notification {\n\treturn n.Notification\n}\n\n// REQUIRED\nfunc (n *Example) OnSave() error {\n\tmsg := fmt.Sprintf(\"received on save trigger\")\n\tn.AddQueue(msg)\n\treturn nil\n}\n\n// REQUIRED\nfunc (n *Example) Test() error {\n\tmsg := fmt.Sprintf(\"received a test trigger\\n\")\n\tn.AddQueue(msg)\n\treturn nil\n}\n\n// REQUIRED - BASIC EVENT\nfunc (n *Example) OnSuccess(s *services.Service) {\n\tmsg := fmt.Sprintf(\"received a count trigger for service: %v\\n\", s.Name)\n\tn.AddQueue(msg)\n}\n\n// REQUIRED - BASIC EVENT\nfunc (n *Example) OnFailure(s *services.Service, f *types.Failure) {\n\tmsg := fmt.Sprintf(\"received a failure trigger for service: %v\\n\", s.Name)\n\tn.AddQueue(msg)\n}\n\n// OPTIONAL\nfunc (n *Example) OnNewService(s *services.Service) {\n\tmsg := fmt.Sprintf(\"received a new service trigger for service: %v\\n\", s.Name)\n\tn.AddQueue(msg)\n}\n\n// OPTIONAL\nfunc (n *Example) OnUpdatedService(s *services.Service) {\n\tmsg := fmt.Sprintf(\"received a update service trigger for service: %v\\n\", s.Name)\n\tn.AddQueue(msg)\n}\n\n// OPTIONAL\nfunc (n *Example) OnDeletedService(s *services.Service) {\n\tmsg := fmt.Sprintf(\"received a delete service trigger for service: %v\\n\", s.Name)\n\tn.AddQueue(msg)\n}\n\n// OPTIONAL\nfunc (n *Example) OnNewUser(s *types.User) {\n\tmsg := fmt.Sprintf(\"received a new user trigger for user: %v\\n\", s.Username)\n\tn.AddQueue(msg)\n}\n\n// OPTIONAL\nfunc (n *Example) OnUpdatedUser(s *types.User) {\n\tmsg := fmt.Sprintf(\"received a updated user trigger for user: %v\\n\", s.Username)\n\tn.AddQueue(msg)\n}\n\n// OPTIONAL\nfunc (n *Example) OnDeletedUser(s *types.User) {\n\tmsg := fmt.Sprintf(\"received a deleted user trigger for user: %v\\n\", s.Username)\n\tn.AddQueue(msg)\n}\n\n// OPTIONAL\nfunc (n *Example) OnUpdatedCore(s *types.Core) {\n\tmsg := fmt.Sprintf(\"received a updated core trigger for core: %v\\n\", s.Name)\n\tn.AddQueue(msg)\n}\n\n// OPTIONAL\nfunc (n *Example) OnNewNotifier(s *Notification) {\n\tmsg := fmt.Sprintf(\"received a new notifier trigger for notifier: %v\\n\", s.Method)\n\tn.AddQueue(msg)\n}\n\n// OPTIONAL\nfunc (n *Example) OnUpdatedNotifier(s *Notification) {\n\tmsg := fmt.Sprintf(\"received a update notifier trigger for notifier: %v\\n\", s.Method)\n\tn.AddQueue(msg)\n}\n```\n\n\n<div class=\"mt-5\" id=\"page_15\"><h1>Prometheus Exporter</h1></div>\nStatping includes a prometheus exporter so you can have even more monitoring power with your services. The prometheus exporter can be seen on `/metrics`, simply create another exporter in your prometheus config. Use your Statping API Secret for the Authorization Bearer header, the `/metrics` URL is dedicated for Prometheus and requires the correct API Secret has `Authorization` header.\n\n# Grafana Dashboard\nStatping has a [Grafana Dashboard](https://grafana.com/dashboards/6950) that you can quickly implement if you've added your Statping service to Prometheus. Import Dashboard ID: `6950` into your Grafana dashboard and watch the metrics come in!\n\n<p align=\"center\"><img width=\"80%\" src=\"https://img.cjx.io/statupgrafana.png\"></p>\n\n## Basic Prometheus Exporter\nIf you have Statping and the Prometheus server in the same Docker network, you can use the yaml config below.\n```yaml\nscrape_configs:\n - job_name: 'statping'\n scrape_interval: 30s\n bearer_token: 'SECRET API KEY HERE'\n static_configs:\n - targets: ['statping:8080']\n```\n\n## Remote URL Prometheus Exporter\nThis exporter yaml below has `scheme: https`, which you can remove if you arn't using HTTPS.\n```yaml\nscrape_configs:\n - job_name: 'statping'\n scheme: https\n scrape_interval: 30s\n bearer_token: 'SECRET API KEY HERE'\n static_configs:\n - targets: ['status.mydomain.com']\n```\n\n### `/metrics` Output\n```\nstatping_total_failures 206\nstatping_total_services 4\nstatping_service_failures{id=\"1\" name=\"Google\"} 0\nstatping_service_latency{id=\"1\" name=\"Google\"} 12\nstatping_service_online{id=\"1\" name=\"Google\"} 1\nstatping_service_status_code{id=\"1\" name=\"Google\"} 200\nstatping_service_response_length{id=\"1\" name=\"Google\"} 10777\nstatping_service_failures{id=\"2\" name=\"Statping.com\"} 0\nstatping_service_latency{id=\"2\" name=\"Statping.com\"} 3\nstatping_service_online{id=\"2\" name=\"Statping.com\"} 1\nstatping_service_status_code{id=\"2\" name=\"Statping.com\"} 200\nstatping_service_response_length{id=\"2\" name=\"Statping.com\"} 2\n```\n\n<div class=\"mt-5\" id=\"page_16\"><h1>SSL</h1></div>\nYou can run Statping with a valid certificate by including 2 files in the root directory. Although, I personally recommend using NGINX or Apache to serve the SSL and then have the webserver direct traffic to the Statping instance. This guide will show you how to implement SSL onto your Statping server with multiple options.\n\n## SSL Certificate with Statping\nTo run the Statping HTTP server in SSL mode, you must include 2 files in the root directory of your Statping application. The 2 files you must include are:\n- `server.crt` SSL Certificate File\n- `server.key` SSL Certificate Key File\n\nThe filenames and extensions must match the exact naming above. If these 2 files are found, Statping will automatically start the HTTP server in SSL mode using your certificates. You can also generate your own SSL certificates, but you will receive a \"ERR_CERT_AUTHORITY_INVALID\" error. To generate your own, follow the commands below:\n\n```shell\nopenssl req -new -sha256 -key server.key -out server.csr\nopenssl x509 -req -sha256 -in server.csr -signkey server.key -out server.crt -days 3650\n```\nThis will generate a self signed certificate that you can use for your Statup instance. I recommend using a web server to do SSL termination for your server though.\n\n## Choose a Web Server or Environment\n\n**Choose the environment running the Statping instance.**\n- [Docker](#docker)\n- [NGINX](#nginx)\n- [Apache](#apache)\n\n## Docker\nDocker might be the easiest way to get up and running with a SSL certificate. Below is a `docker-compose.yml` file that will run NGINX, LetEncrypt, and Statping.\n\n1. Point your domain or subdomain to the IP address of the Docker server. This would be done on CloudFlare, Route53, or some other DNS provider.\n\n2. Replace the `docker-compose.yml` contents:\n- `MY.DOMAIN.COM` with the domain you want to use\n- `MY@EMAIL.COM` with your email address\n\n3. Run the docker container by running command `docker-compose up -d`. Give a little bit of time for LetEncrypt to automatically generate your SSL certificate.\n\n###### `docker-compose.yml`\n```yaml\nversion: '2.3'\nservices:\n nginx:\n container_name: nginx\n image: jwilder/nginx-proxy\n ports:\n - 0.0.0.0:80:80\n - 0.0.0.0:443:443\n labels:\n - \"com.github.jrcs.letsencrypt_nginx_proxy_companion.nginx_proxy\"\n networks:\n - internet\n restart: always\n volumes:\n - /var/run/docker.sock:/tmp/docker.sock:ro\n - ./statping/nginx/certs:/etc/nginx/certs:ro\n - ./statping/nginx/vhost:/etc/nginx/vhost.d\n - ./statping/nginx/html:/usr/share/nginx/html:ro\n - ./statping/nginx/dhparam:/etc/nginx/dhparam\n environment:\n DEFAULT_HOST: MY.DOMAIN.COM\n\n letsencrypt:\n container_name: letsencrypt\n image: jrcs/letsencrypt-nginx-proxy-companion\n networks:\n - internet\n restart: always\n volumes:\n - /var/run/docker.sock:/var/run/docker.sock:ro\n - ./statping/nginx/certs:/etc/nginx/certs\n - ./statping/nginx/vhost:/etc/nginx/vhost.d\n - ./statping/nginx/html:/usr/share/nginx/html\n - ./statping/nginx/dhparam:/etc/nginx/dhparam\n\n statping:\n container_name: statping\n image: hunterlong/statping:latest\n restart: always\n networks:\n - internet\n depends_on:\n - nginx\n volumes:\n - ./statping/app:/app\n environment:\n VIRTUAL_HOST: MY.DOMAIN.COM\n VIRTUAL_PORT: 8080\n LETSENCRYPT_HOST: MY.DOMAIN.COM\n LETSENCRYPT_EMAIL: MY@EMAIL.COM\n\nnetworks:\n internet:\n driver: bridge\n```\n\n## NGINX\nIf you already have a NGINX web server running, you just have to add a proxy pass and your SSL certs to the nginx config or as a vhost. By default Statping runs on port 8080, you can change this port by starting server with `statping -ip 127.0.0.1 -port 9595`.\n\n- Replace `/my/absolute/directory/for/cert/server.crt` with SSL certificate file.\n- Replace `/my/absolute/directory/for/key/server.key` with SSL key file.\n- Run `service nginx restart` and try out https on your domain.\n\n##### Tutorials\n- [NGINX Guide](https://docs.nginx.com/nginx/admin-guide/security-controls/terminating-ssl-http/)\n- [How To Set Up Nginx Load Balancing with SSL Termination](https://www.digitalocean.com/community/tutorials/how-to-set-up-nginx-load-balancing-with-ssl-termination)\n\n###### `/etc/nginx/nginx.conf`\n```\n#user nobody;\nworker_processes 1;\nevents {\n worker_connections 1024;\n}\nhttp {\n include mime.types;\n default_type application/octet-stream;\n send_timeout 1800;\n sendfile on;\n keepalive_timeout 6500;\n server {\n listen 80;\n server_name localhost;\n location / {\n proxy_pass http://localhost:8080;\n proxy_set_header Host $host;\n proxy_set_header X-Real-IP $remote_addr;\n proxy_set_header X-Forwarded-For $proxy_add_x_forwarded_for;\n proxy_set_header X-Client-Verify SUCCESS;\n proxy_set_header X-Client-DN $ssl_client_s_dn;\n proxy_set_header X-SSL-Subject $ssl_client_s_dn;\n proxy_set_header X-SSL-Issuer $ssl_client_i_dn;\n proxy_read_timeout 1800;\n proxy_connect_timeout 1800;\n }\n }\n # HTTPS server\n \n server {\n listen 443;\n server_name localhost;\n \n ssl on;\n ssl_certificate /my/absolute/directory/for/cert/server.crt;\n ssl_certificate_key /my/absolute/directory/for/key/server.key;\n ssl_session_timeout 5m;\n \n ssl_protocols SSLv2 SSLv3 TLSv1;\n ssl_ciphers ALL:!ADH:!EXPORT56:RC4+RSA:+HIGH:+MEDIUM:+LOW:+SSLv2:+EXP;\n ssl_prefer_server_ciphers on;\n \n location / {\n proxy_pass http://localhost:8080;\n proxy_set_header Host $host;\n proxy_set_header X-Real-IP $remote_addr;\n proxy_set_header X-Forwarded-For $proxy_add_x_forwarded_for;\n proxy_set_header X-Client-Verify SUCCESS;\n proxy_set_header X-Client-DN $ssl_client_s_dn;\n proxy_set_header X-SSL-Subject $ssl_client_s_dn;\n proxy_set_header X-SSL-Issuer $ssl_client_i_dn;\n proxy_read_timeout 1800;\n proxy_connect_timeout 1800;\n }\n }\n}\n```\n\n## Apache\n\n<div class=\"mt-5\" id=\"page_17\"><h1>Config with .env File</h1></div>\nIt may be useful to load your environment using a `.env` file in the root directory of your Statping server. The .env file will be automatically loaded on startup and will overwrite all values you have in config.yml.\n\nIf you have the `DB_CONN` environment variable set Statping will bypass all values in config.yml and will require you to have the other DB_* variables in place. You can pass in these environment variables without requiring a .env file.\n\n## `.env` File\n```bash\nDB_CONN=postgres\nDB_HOST=0.0.0.0\nDB_PORT=5432\nDB_USER=root\nDB_PASS=password123\nDB_DATABASE=root\n\nNAME=Demo\nDESCRIPTION=This is an awesome page\nDOMAIN=https://domain.com\nADMIN_USER=admin\nADMIN_PASSWORD=admin\nADMIN_EMAIL=info@admin.com\nUSE_CDN=true\nPOSTGRES_SSLMODE=false # enable ssl_mode for postgres (To enable use require)\nDISABLE_LOGS=false # disable logs from appearing and writing to disk\n\nIS_DOCKER=false\nIS_AWS=false\nSASS=/usr/local/bin/sass\nCMD_FILE=/bin/bash\n```\nThis .env file will include additional variables in the future, subscribe to this repo to keep up-to-date with changes and updates. \n\n<div class=\"mt-5\" id=\"page_18\"><h1>Static Export</h1></div>\nIf you want to use Statping as a CLI application without running a server, you can export your status page to a static HTML.\nThis export tool is very useful for people who want to export their HTML and upload/commit it to Github Pages or an FTP server.\n```dash\nstatup export\n```\n###### Creates `index.html` in the current directory with CDN asset URL's. 💃 \n\n<div class=\"mt-5\" id=\"page_19\"><h1>Statping Plugins</h1></div>\nSince Statping is built in Go Language we can use the [Go Plugin](https://golang.org/pkg/plugin/) feature to create dynamic plugins that run on load. Statping has an event anytime anything happens, you can create your own plugins and do any type of function. To implement your own ideas into Statping, use the plugin using the [statup/plugin](https://github.com/statping/statping/blob/master/plugin/main.go) package.\n```\ngo get github.com/statping/statping/plugin\n```\n\n## Example Plugin\nStart off with the [Example Statping Plugin](https://github.com/statping/statping_plugin) that includes all the interfaces and some custom options for you to expand on. You can include any type of function in your own plugin!\n\n<p align=\"center\">\n<img width=\"95%\" src=\"https://img.cjx.io/statuppluginrun.gif\">\n</p>\n\n## Building Plugins\nPlugins don't need a push request and they can be private! You'll need to compile your plugin to the Golang `.so` binary format. Once you've built your plugin, insert it into the `plugins` folder in your Statping directory and reboot the application. Clone the [Example Statping Plugin](https://github.com/statping/statping_plugin) repo and try to build it yourself!\n\n#### Build Requirements\n- You must have `main.go`\n- You must create the Plugin variable on `init()`\n\n```bash\ngit clone https://github.com/statping/statping_plugin\ncd statup-plugin\ngo build -buildmode=plugin -o example.so\n```\n###### Insert `example.so` into the `plugins` directory and reload Statping\n\n## Testing Statping Plugins\nStatping includes a couple tools to help you on your Plugin journey, you can use `statup test plugins` command to test all plugins in your `/plugins` folder. This test will attempt to parse your plugin details, and then it will send events for your plugin to be fired.\n```\nstatup test plugins\n```\n<p align=\"center\">\n<img width=\"85%\" src=\"https://img.cjx.io/statupplugintester.gif\">\n</p>\n\nYour plugin should be able to parse and receive events before distributing it. The test tools creates a temporary database (SQLite) that your plugin can interact with. Statping uses [upper.io/db.v3](https://upper.io/db.v3) for database interactions. The database is passed to your plugin `OnLoad(db sqlbuilder.Database)`, so you can use the `db` variable passed here.\n\n## Statping Plugin Interface\nPlease remember Golang plugin's are very new and Statping plugin package may change and 'could' brake your plugin. Checkout the [statup/plugin package](https://github.com/statping/statping/blob/master/plugin/main.go) to see the most current interfaces.\n```go\ntype PluginActions interface {\n\tGetInfo() Info\n\tGetForm() string\n\tSetInfo(map[string]interface{}) Info\n\tRoutes() []Routing\n\tOnSave(map[string]interface{})\n\tOnFailure(map[string]interface{})\n\tOnSuccess(map[string]interface{})\n\tOnSettingsSaved(map[string]interface{})\n\tOnNewUser(map[string]interface{})\n\tOnNewService(map[string]interface{})\n\tOnUpdatedService(map[string]interface{})\n\tOnDeletedService(map[string]interface{})\n\tOnInstall(map[string]interface{})\n\tOnUninstall(map[string]interface{})\n\tOnBeforeRequest(map[string]interface{})\n\tOnAfterRequest(map[string]interface{})\n\tOnShutdown()\n\tOnLoad(sqlbuilder.Database)\n}\n```\n\n## Event Parameters\nAll event interfaces for the Statping Plugin will return a `map[string]interface{}` type, this is because the plugin package will most likely update and change in the future, but using this type will allow your plugin to continue even after updates.\n\n## Example of an Event\nKnowing what happens during an event is important for your plugin. For example, lets have an event that echo something when a service has a Failure status being issued. Checkout some example below to see how this golang plugin action works. \n\n```go\nfunc (p pkg) OnSuccess(data map[string]interface{}) {\n fmt.Println(\"Statping Example Plugin received a successful service hit! \")\n fmt.Println(\"Name: \", data[\"Name\"])\n fmt.Println(\"Domain: \", data[\"Domain\"])\n fmt.Println(\"Method: \", data[\"Method\"])\n fmt.Println(\"Latency: \", data[\"Latency\"])\n}\n```\n###### OnSuccess is fired every time a service has check it be online\n\n```go\nfunc OnFailure(service map[string]interface{}) {\n fmt.Println(\"oh no! an event is failing right now! do something!\")\n fmt.Println(service)\n}\n```\n###### OnFailure is fired every time a service is failing\n\n```go\nfunc (p pkg) OnLoad(db sqlbuilder.Database) {\n fmt.Println(\"=============================================================\")\n fmt.Printf(\" Statping Example Plugin Loaded using %v database\\n\", db.Name())\n fmt.Println(\"=============================================================\")\n}\n```\n###### OnLoad is fired after plugin is loaded into the environment\n\n\n## Interacting with Database\nThe Example Statping Plugin includes a variable `Database` that will allow you to interact with the Statping database. Checkout [database.go](https://github.com/statping/statping_plugin/blob/master/database.go) to see a full example of Create, Read, Update and then Deleting a custom Communication entry into the database.\n```go\n// Insert a new communication into database\n// once inserted, return the Communication\nfunc (c *Communication) Create() *Communication {\n\tuuid, err := CommunicationTable().Insert(c)\n\tif err != nil {\n\t\tpanic(err)\n\t}\n\tc.Id = uuid.(int64)\n\treturn c\n}\n```\n\n## Custom HTTP Routes\nPlugin's can include their own HTTP route to accept GET/POST requests. Route are loaded after Statping loads all of it's Routes. Checkout [routes.go](https://github.com/statping/statping_plugin/blob/master/routes.go) on the example plugin to see a full example of how to use it.\n```go\n// You must have a Routes() method in your plugin\nfunc (p *pkg) Routes() []plugin.Routing {\n\treturn []plugin.Routing{{\n\t\tURL: \"hello\",\n\t\tMethod: \"GET\",\n\t\tHandler: CustomInfoHandler,\n\t}}\n}\n\n// This is the HTTP handler for the '/hello' URL created above\nfunc CustomInfoHandler(w http.ResponseWriter, r *http.Request) {\n\tw.WriteHeader(http.StatusOK)\n\tfmt.Fprintln(w, \"Oh Wow!!! This is cool...\")\n}\n```\n\n\n## Plugin To-Do List\n- [ ] Ability to includes assets like jpg, json, etc\n\n<div class=\"mt-5\" id=\"page_20\"><h1>Statuper</h1></div>\nStatping includes a simple to use installation shell script that will help you install locally, Docker, and even onto a AWS EC2 instance.\n\n<p align=\"center\">\n<img width=\"90%\" src=\"https://img.cjx.io/statuper1.png\">\n</p>\n\n## Installation\n```bash\ncurl -O https://assets.statup.io/statuper && chmod +x statuper\n```\n\n## Usage\n- `statuper`\n\n<div class=\"mt-5\" id=\"page_21\"><h1>Build and Test</h1></div>\nBuilding from the Go Language source code is pretty easy if you already have Go installed. Clone this repo and `cd` into it. \n\n### Git n' Go Get\n```bash\ngit clone https://github.com/statping/statping.git\ncd statup\ngo get -v\n```\n\n### Install go.rice\nStatping uses go.rice to compile HTML, JS, and CSS files into it's single binary output.\n```\ngo get github.com/GeertJohan/go.rice\ngo get github.com/GeertJohan/go.rice/rice\n```\n\n### Build Statping Binary\nStatping uses go.rice to compile HTML, JS, and CSS files into it's single binary output.\n```\nrice embed-go\ngo build -o statup .\n./statup version\n```\n\n### Test Coverage\nYou can also test Statio on your localhost, but it does require a MySQL, and Postgres server to be accessible since testing does create/drop tables for multiple databases. \n```\ngo test -v\n```\n\n<div class=\"mt-5\" id=\"page_22\"><h1>Contributing</h1></div>\nHave a feature you want to implement into Statping!? Awesome! Follow this guide to see how you can test, compile and build Statping for production use. I recommend you use `make` with this process, it will save you time and it will auto include many customized parameters to get everything working correctly.\n\n# Dependencies\nStatping has a couple of required dependencies when testing and compiling the binary. The [Makefile](https://github.com/statping/statping/blob/master/Makefile) will make these tasks a lot easier. Take a look at the Makefile to see what commands are ran. Run the command below to get setup right away.\n```bash\nmake dev-deps\n```\nList of requirements for compiling assets, building binary, and testing.\n- [Go Language](https://golang.org/) (currently `1.10.3`)\n- [Docker](https://docs.docker.com/)\n- [SASS](https://sass-lang.com/install)\n- [Cypress](https://www.cypress.io/) (only used for UI testing, `make cypress-install`)\n\n# Compiling Assets\nThis Golang project uses [rice](https://github.com/GeertJohan/go.rice) to compile static assets into a single file. The file `source/rice-box.go` is never committed to the Github repo, it is automatically created on build. Statping also requires `sass` to be installed on your local OS. To compile all the static assets run the command below:\n\n```bash\nmake compile\n```\nAfter this is complete, you'll notice the `source/rice-box.go` file has been generated. You can now continue to build, and test.\n\n# Testing\nStatping includes multiple ways to Test the application, you can run the `make` command, or the normal `go test` command. To see the full experience of your updates, you can even run Cypress tests which is in the `.dev/test` folder.\n\nStatping will run all tests in `cmd` folder on MySQL, Postgres, and SQLite databases. You can run `make databases` to automatically create MySQL and Postgres with Docker.\n\n###### Go Unit Testing:\n```bash\nmake test\n```\n\n###### Cypress UI Testing:\n```bash\nmake cypress-test\n```\n\n###### Test Everything:\n```bash\nmake test-all\n```\n\n# Build\nStatping will build on all operating systems except Windows 32-bit. I personally use [xgo](https://github.com/karalabe/xgo) to cross-compile on multiple systems using Docker. Follow the commands below to build on your local system.\n\n###### Build for local operating system:\n```bash\nmake build\n```\n\n# Compile for Production\nOnce you've tested and built locally, you can compile Statping for all available operating systems using the command below. This command will require you to have Docker.\n\n```bash\nmake build-all\n```\n\n# What Now\nEverything tested, compiled and worked out!? Awesome! 💃 You can now commit your changes, and submit a Pull Request with the features/bugs you added or removed.\n\n\n\n\n\n<div class=\"mt-5\" id=\"page_23\"><h1>PGP Signature</h1></div>\nYou can check if the Statping binary you downloaded is authentic by running a few commands.\n\n### Steps to Authenticate\n1. Download the Statping `tar.gz` file from [Latest Releases](https://github.com/statping/statping/releases/latest) and extract the `statping` binary and the `statup.asc` file.\n2. Run command: `gpg --verify statping.asc`\n3. You should see `Good signature from \"Hunter Long <info@statping.com>\" [ultimate]`.\n\n# Statping Public Key\n- [https://statping.com/statping.gpg](https://statping.com/statping.gpg)\n\nYou can also download the key with the command below:\n```\nwget https://statping.com/statping.gpg\n```\n\n###### `statping.gpg`\n```\n-----BEGIN PGP PUBLIC KEY BLOCK-----\n\nmQINBFwGUYIBEADNsDY4aUOx8EoZuTRFPtjuadJzFRyKtHhw/tLlAnoFACanZPIT\nNZoRYvRR5v6lMDXdxsteDbJEOhZ1WDiKIr4OyMahPsyyH6ULzSBKgePUswa0sDef\nUnXYzPFQCzqQyQQFbp9AYfDP7dW6dTL9I6qU2NqlJvjxJiiZTAq87SmsLqHiASnI\n+ottnQuu6vJQBJz2PFIuaS1c3js/+HBbth9GK5B9YN1BIIyZoFmWKVU9HnJf+aM3\nUs6OLjjwYwWzQH38ZV84IjVXyiP9PQVhlCXeHK7XdhPZvnSP1m5Wszj/jowwY6Mz\nLgLotfL540X7yOJ7hJTFYLFBOtJdJr/3Ov8SH4HXdPFPVG+UqxsmtmPqUQ9iAxAE\njRFfkAxBvH5Szf2WZdaLnlrrOcOKJIIjZgHqalquBTAhlh5ul0lUVSSPxetwIBlW\n60L41k94NJFGDt8xOJ+122mLcywmQ1CzhDfeIKlxl6JDiVHjoRqlQQrqIoNZMV85\nrzGfrmbuwv1MXGBJoiNy3330ujOBmhQ9dQVwKpxhBKdjnAgIGM9szbUYxIkGgM1O\nU4b1WF3AF/9JOpKJ0LewslpM3BFFYnemGsHXAv3TBPqKidNdwMAiBOtNykGoXF6i\n0D6jOW/IB1da0gUA+kr5JdAOwIG7JXKhur2MO7Ncid59DL2N8RePRWj+jwARAQAB\ntB9IdW50ZXIgTG9uZyA8aW5mb0BzdGF0cGluZy5jb20+iQJOBBMBCAA4FiEEt21h\n+qbbdZRm6D2ZZLnGquLVUngFAlwGUYICGwMFCwkIBwIGFQoJCAsCBBYCAwECHgEC\nF4AACgkQZLnGquLVUnizwA//c7vmwTMq/8LYlbo37WM2kDE9AKIrz6VSMq4RhGbC\nLikH0X0epa+if79n9BZrVU/Af3aKTn7vu2J4XrvzcdCXtcsR0YmCWML2Y6OSFmhX\nw3o6woiFcp+SUWdcM/kithRun+j9sKV4akdgkdBQUdh/RMVln+radz1c6G59iTdh\nS+Ip3ObO7Gn5VnrLwxix+W9Jhg8YhDgDGEDt8e1yvjuMRY+WhjHFlwEMoE0kvQL8\nQvQH2dGD3dExWAuIL7+0xC0ZGU0PR8vRrq1ukdIsWlDY+42vvhcyPZKFFDTM/QLF\nFcCNiPSGhiK/NQq67xnRMFdh0fnqbydWj2atMpacIrheEkOt8db2/UMyDOwlIxgy\nKOG8x+yNKiG9LyvW4axRLctN608/+TbvtFo5TVOFJYxJQp4b5uz7LgJAJw7PBvfC\nbqx64BH8WGzgyGcAl9unQEtpDuxXoKvP2kbsS7hjvhK0gJgW9llpV4sRJJGApTBc\nWtbcS9DBGs3k1aZdA72bxnayD32syVz7czl4+tkRsbQZ4VgJh1yrHIDsdWQXFnYu\nEQJfCgX5HvvC13MpDUth0NWCFtWQirY3EFbIgSuhB/D5iXA+Dt1Dq5c1u7wQlUVi\nLQCU++oMGrlU3gZrnov5lnBGCEjn0O9bKQm8zmLdEcENFxUZvfPjOIY64YprZxD9\nBv65Ag0EXAZRggEQAMmjHmnvH8SvNJhku/oI96dFKen3bg9xdaFUD1vAuNglCalH\nwgXcCZd0RdobYNG46cXTzTQadtHS4hi/UBJ+oy5ZUpIRglW12eTYtqM2G11VbcQi\nj6rLITP9NIP+G1xBICSYK4UwmH55BolMEQ/1ZX0a9rESM9stDNglheCCudbMGR/1\nZYnufdEsh0yPwyC/1upZeu8LPWK62pt9mE/gccx77QTeDi5OJcRf1fPbUTCm3vSS\nwPPV2AGANodIhostjDymt5vh0tGwc7oUZZLnVdErfuctv7yMgZdiCpYu0jFy1NYf\nJgOpZasrcK7/1ozGzsfAo/sSU4kIkMwuWGgqfx5kGRK2CgU4T0i7oI6DMpOX9ZS8\ns3+oCWu83X0ofvm5R2CbjiUj2gR6JOhBQbJpCeTkLe+SFcUpnyrr7lG8B8QZHm5N\nnBi05V/s63RE3g/6WpR/fWuh+uswe01uqlSx9deW7jT49BL/MdSxwjfwLBLz/hLM\n0ld385XAd9bqMjUtp0XhZX2YORx3f/aKY7PYA62baGibb5RdPRw6viEAWU20eb+8\nX9Pa7hGmwUeal5lka4SD/TGl7wdY+g4oYP+jtKinH/ZftWA5wHTe3jWT5bdWrT2d\ne+0qA0SBkmKIDLpktvtTa19w2nfwBIwJ6fN36ZjYpOn/stxR7aRtnhSqvzxbABEB\nAAGJAjYEGAEIACAWIQS3bWH6ptt1lGboPZlkucaq4tVSeAUCXAZRggIbDAAKCRBk\nucaq4tVSeGWmD/9Pg1x6s98zdZCQa2apmUnuoQAQA9Gf2RBBuglCDGsY67wbvdHZ\n9wdFRs2QEhl2O3oFmidxthBOBRl9z62nXliLwNn1Lcy/yDfaB8wH6gMm4jn2N/z9\nvQXnyIzg8m4PItZ1p5mnY3qH5lpGF8r9Gb7tzK10rqulM2XTDojZOevlEGI6LGw8\nFjccXtNquqGZwxzytmKF3T7UBmpmt2qock8N5iJn987m6WeYmbFNc0ii0guHfdtO\nzQcItz2ngCdyvfgQPwCAoAv72ysSGhz5KZgAXRrEdcqj6Jw3ivoEUKq1aUrYncXQ\n3zC3ED6AjWOGRzjvTZzj22IVacUZ0gqx0x/oldXLOhMB9u6nFXHKj1n9nc0XHMNi\nLp9EuvQgcNLjFZGE9sxh25u9V+OhItfT/aarYEu/Xq0IkUUcdz4GehXth1/Cq1wH\nlSUie4nCs7I7OWhqMNClqP7ywElDXsQ66MCgvf01Dh64YUVjJNnyyK0QiYlCx/JQ\nZ85hNLtVXZfYqC5BRZlVFp8I8Rs2Qos9YEgn2M22+Rj+RIeD74LZFB7Q4myRvTMB\n/P466dFI83KYhwvjBYOP3jPTrV7Ky8poEGifQp2mM294CFIPS7z0z7a8+yMzcsRP\nOluFxewsEO0QNDrfFb+0gnjYlnGqOFcZjUMXbDdY5oLSPtXohynuTK1qyQ==\n=Xn0G\n-----END PGP PUBLIC KEY BLOCK-----\n```\n\n<div class=\"mt-5\" id=\"page_24\"><h1>Testing</h1></div>\nIf you want to test your updates with the current golang testing units, you can follow the guide below to run a full test process. Each test for Statping will run in MySQL, Postgres, and SQlite to make sure all database types work correctly.\n\n## Create Docker Databases\nThe easiest way to run the tests on all 3 databases is by starting temporary databases servers with Docker. Docker is available for Linux, Mac and Windows. You can download/install it by going to the [Docker Installation](https://docs.docker.com/install/) site.\n\n```go\ndocker run -it -d \\\n -p 3306:3306 \\\n -env MYSQL_ROOT_PASSWORD=password123 \\\n -env MYSQL_DATABASE=root mysql\n```\n\n```go\ndocker run -it -d \\\n -p 5432:5432 \\\n -env POSTGRES_PASSWORD=password123 \\\n -env POSTGRES_USER=root \\\n -env POSTGRES_DB=root postgres\n```\n\nOnce you have MySQL and Postgres running, you can begin the testing. SQLite database will automatically create a `statup.db` file and will delete after testing.\n\n## Run Tests\nInsert the database environment variables to auto connect the the databases and run the normal test command: `go test -v`. You'll see a verbose output of each test. If all tests pass, make a push request! 💃\n```go\nDB_DATABASE=root \\\n DB_USER=root \\\n DB_PASS=password123 \\\n DB_HOST=localhost \\\n go test -v\n```\n\n<div class=\"mt-5\" id=\"page_25\"><h1>Deployment</h1></div>\nStatping is a pretty cool server for monitoring your services. The way we deploy might be a little cooler though. Statping is using the most bleeding edge technology to release updates and distribute binary files automatically.\n\n1. Source code commits get pushed to Github\n2. [Rice](https://github.com/GeertJohan/go.rice) will compile all the static assets into 1 file (rice-box.go in source)\n3. SASS will generate a compiled version of the CSS. \n4. Statping Help page is generated by cloning the Wiki repo using `go generate`.\n5. Travis-CI tests the Golang application.\n6. Travis-CI tests the Statping API using [Postman](https://github.com/statping/statping/blob/master/source/tmpl/postman.json).\n7. If all tests are successful, Travis-CI will compile the binaries using [xgo](https://github.com/karalabe/xgo).\n8. Binaries are code signed using the official [PGP key](https://github.com/statping/statping/wiki/PGP-Signature) and compressed.\n9. [Docker](https://cloud.docker.com/repository/docker/hunterlong/statping/builds) receives a trigger to build for the `latest` tag.\n10. Travis-CI uploads the [latest release](https://github.com/statping/statping/releases) as a tagged version on Github.\n11. Travis-CI updates the [homebrew-statping](https://github.com/hunterlong/homebrew-statping) repo with the latest version.\n\nAnd that's it! Statping is ready to be shipped and installed.\n\n")
CompiledWiki contains all of the Statping Wiki pages from the Github Wiki repo.
Functions 
func Assets 
func Assets() error
Assets will load the Rice boxes containing the CSS, SCSS, favicon, and HTML files.
func CompileSASS 
func CompileSASS() error
CompileSASS will attempt to compile the SASS files into CSS
func CopyAllToPublic ¶ added in v0.79.2
func CopyAllToPublic(box *rice.Box) error
CopyAllToPublic will copy all the files in a rice box into a local folder
func CopyToPublic 
CopyToPublic will create a file from a rice Box to the '/assets' directory
func CreateAllAssets 
CreateAllAssets will dump HTML, CSS, SCSS, and favicon assets into the '/assets' directory
func DeleteAllAssets 
DeleteAllAssets will delete the '/assets' folder
func MakePublicFolder 
MakePublicFolder will create a new folder
func OpenAsset 
OpenAsset returns a file's contents as a string
Example 
OpenAsset("js/main.js")
Output:
func SaveAsset 
SaveAsset will save an asset to the '/assets/' folder.
Example 
data := []byte("alert('helloooo')")
SaveAsset(data, "js/test.js")
Output:
func UsingAssets 
UsingAssets returns true if the '/assets' folder is found in the directory
Types 
This section is empty.