 README
README

orcais a SSH gateway comparable to a reverse HTTP proxy. You
can use orca to enable your employees to connect to internal servers without
the need to build a VPN. Simply put orca in front of your servers and you can
connect to any backend server via SSH.
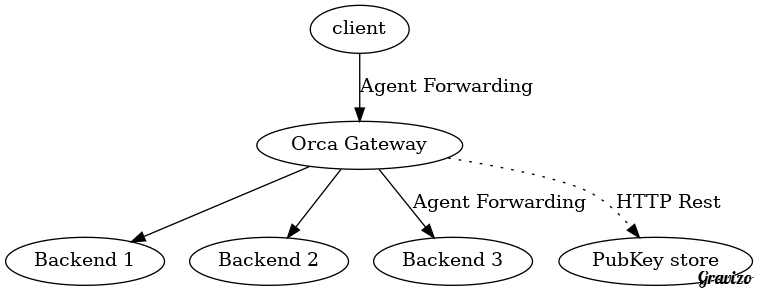
Orca uses a public key store to query the user for a given public key. You can
implement your own REST service (its one single function) or you can use the
preimplemented key store bundled with orca which uses a clustered etcd
backbone to store all the public keys.
Install/Build
For quick testdrive there is a docker image!
To build orca you need make bower and go.
Create a new workspace in your home and execute the included setup.sh. You do not
need to clone before, the setup.sh clones:
~ mkdir orcaWorkspace
~ cd orcaWorkspace
~ curl https://raw.githubusercontent.com/clusterit/orca/master/setup.sh | /bin/sh
Now you have a ~/orcaWorkspace directory which should be embedded in your GOPATH. This
workspace contains all needed dependencies. If you don't want a separate project directory
for orca you do a go get github.com/clusterit/orca/cmd/gateway and the gateway will
be installed in your default GOPATH. The other tools can be built with make.
All binaries are built into src/github.com/clusterit/orca/packaging/.
TODO: dockerize the build
Usage
Please install etcd and start a cluster; a single machine cluster is ok.
If your etcd cluster is not accessible via http://localhost:4001 you can
specify a different location via the -e ... flag. You can also name your
zone with -z myhomezone.
In a production you should use an etcd cluster with https and client
certificates. You can specifiy the clustermembers with -e https://<etcd-member>
and also specify the --etcdkey, --etcdcert (key and cert of the client) and
--etcdca (the cert of the rootca; not necessarily needed). Another option are the
environment variables:
- ORCA_ETCD_MACHINES
- ORCA_ETCD_KEY
- ORCA_ETCD_CERT
- ORCA_ETCD_CA
If you want a testdrive, start an etcd-cluster with goreman start in the testing
subdirectory. You can then
cd testing
export ORCA_ETCD_MACHINES=https://localhost:4001,https://localhost:4002,https://localhost:4003
export ORCA_ETCD_KEY=`pwd`/ssl/client.key
export ORCA_ETCD_CERT=`pwd`/ssl/client.cert
orcaman uses an external Oauth provider to authenticate. So first of all, please
register a new application with your github account, navigate to your settings
and register a new application. Enter
Orca local as name and http://localhost:9011 as homepage URL. The redirect
url should be http://localhost:9011/redirect.html. Now click on Update Application
and you will get a Client ID and a Client Secret. As the name says, keep the
secret in a secret place :-).
Start orcaman and register a oauth provider (at this time, orca knows
the settings for github and google):
orcaman provider github <your-clientid> <your-clientsecret>
2015/04/18 16:04:03 [DEBUG] no zones existing, creating zone 'intranet'.
2015/04/18 16:04:06 [DEBUG] create a default gatway setting
2015/04/18 16:04:07 [DEBUG] create a default ManagerConfig setting
(*oauth.OauthRegistration)(0xc208070420)({
 Network: (string) (len=6) "github",
 ClientId: (string) (len=20) "<your-clientid>",
 ClientSecret: (string) (len=40) "<your-clientsecret>",
 Scopes: (string) (len=10) "user:email",
 AuthUrl: (string) (len=40) "https://github.com/login/oauth/authorize",
 AccessTokenUrl: (string) (len=43) "https://github.com/login/oauth/access_token",
 UserinfoUrl: (string) (len=27) "https://api.github.com/user",
 PathId: (string) (len=5) "login",
 PathName: (string) (len=4) "name",
 PathPicture: (string) (len=10) "avatar_url",
 PathCover: (string) ""
})
Next, register an admin account. Prefix your account with the name of the provider you used in the previous step:
orcaman admins github:<your-github-account>
Last, but not least, start orcaman:
orcaman serve
2015/04/18 16:06:28 [INFO] start listening on :9011
Now you can connect

and login with your github account

First, upload a public key, so click on the Key tab and add a new key:

In another console you can now start the gateway:
gateway
2015/04/18 16:55:07 [INFO] gateway listens on "[::]:2022" ...
If you want to connect to a known computer via the gateway, you should first add your keys to your agent:
ssh-add <your-key-file>
You can leave the filename and ssh-add will add your default keys.
After that you can try to login (please accept the server key; you can change
it via orcaman):
ssh -A -p 2022 usc@192.168.0.21@localhost
usc@192.168.0.21@localhost's password:
As you can see, the address of the server uses the form
user@<your-server>@gateway. You can also use ssh -l user@<your-server> gateway
to specify the user, because the userid must include the name of the target server.
And as a third option you can configure a default server
where the gateway will delegate a call; in this case you can omit <your-server>.
In the upper example the gateway denies access and prompts for a password (which will also not be accepted because you don't have one):
2015/04/18 16:55:48 [DEBUG] remote: 127.0.0.1:55746: cannot fetch key for user 'usc@192.168.0.21': HTTP 404: {"error":"entity could not be found"}
2015/04/18 16:55:48 [DEBUG] remote: 127.0.0.1:55746: cannot fetch key for user 'usc@192.168.0.21': HTTP 404: {"error":"entity could not be found"}
2015/04/18 16:55:48 [DEBUG] remote: 127.0.0.1:55746: not allowed to login for user 'usc@192.168.0.21': please activate your account
2015/04/18 16:55:49 [ERROR] failed to handshake (EOF)
Here you see three attempts to login, because i have three keys in my local development computer here (ssh-add'ed). Two of the attepmts were not accepted because the gateway could not find an acceptable user for the provided public key. The third was denied, because the account is not activated, so lets activate it for 1 hour:

If you now try the login again, it should succeed!
2015/04/18 17:03:23 [INFO] remote: 127.0.0.1:55777: login by &{Id:0e65dc4d-144d-4410-bad2-88f25ae634df Name:ulrichSchreiner Keys:[{Id:usc@fedorabox Value:ssh-rsa .... Fingerprint:... }] Roles:USER,MANAGER Aliases:[ulrichSchreiner@github] Allowance:0xc208114c00}
2015/04/18 17:03:23 [INFO] [client=127.0.0.1:55777] [sid=3f1bee208f674830239f3fbc2fc5ab1164578928ff9cc510fd8d530410a39d58] new ssh connection with [SSH-2.0-OpenSSH_6.6.1p1 Ubuntu-8]
You don't need to use the time based login, go to the Gateway Settings and disable them. You can also change the loglevel and the SSH Server key. Please note that a change of this values is published to all gateway's in the selected zone. You don't have to restart:

As you have seen, the gatway also supports 2FA. To use this feature you need a OTP app on your mobile. Links to them are embedded in the application. After you installed such an application, go to your account page and click on ENABLE:

After you scanned the QR code you must enter an OTP password displayed on your OTP application. If you entered the right one you have successfully activated 2FA!

After this activation, you need your private SSH key and you also need your mobile. The SSH gateway will prompt you for a password and you must enter the current one time password displayed in your app.
As you can see in the screenshot, there is a caching option. If you don't want to enter your OTP every time you can use the slider to let the gateway cache your successful authentication. Please note that the administrator of the gateway can overwrite this value with an upper limit! The default value in the gateway is 0, so it doesn't matter what the user set; a zero value in the gateway simply disables 2FA caching.
Please note that the TOTP is only used for the SSH gateway; it is not used for
the Web-UI! If you want to use Two Factor Authentication for the frontend too,
you have to enable it with the account provider (google, github, ...). So if
anyone steals your oauth-credentials, the attacker can login, upload public
keys and create a new TOTP secret!
If you decide to use the web frontend in the internet your users should be
aware of this. Otherwise you should think about using the frontend only in
the intranet.
Oauth Providers
To register new OAuth providers, you can use predefined ones (google, github)
or you can insert the values you want. Here are some templates for given
oauth servers:
Gitlab
- name:
gitlab - clientid/clientsecret: generate via Gitlab Admin UI
- scopes: empty
- Auth Url:
<yourgitlabserver>/oauth/authorize - Access Token Url:
<yourgitlabserver>/oauth/token - Userinfo Url:
<yourgitlabserver>/api/v3/user - Path Id:
username - Path Name:
name - Path Picture:
avatar_url
Components
orca has the different components, one for the ssh gateway, another for the management
interface/rest services.
SSH Gateway
This is the SSH daemon that listens for incoming requests. Any request must have one or more
public keys and the gateway invokes a REST call UserByKey to get the user for the given public
key. If there is no such user, the login will be denied.
If there is a user, the gateway checks an optinal Allowance. This check can be enforced, so that the user has to login via a second channel (a web UI) and click on a button to allow the login for a specific duration.
After the permission to login to the gateway is granted, the request will be forwarded to the
referenced backend server with current ssh-agent provided keys.
OrcaMan
The orcaman provides Rest-Services and an embedded HTML5 app. This application can be used
to store keys inside etcd and to request an Allowance for a specific time. If you have
the MANAGER role you can also register new users and change some other settings.
The orcaman also implements the UserByKey REST endpoint
which is needed by the gateway. If you start orcaman with a publish address it registeres
itself within a wellknown key inside of etcd so it will be discoverable by the gateway. After
stopping or crashing orcaman it will deregister automatically.
To secure the REST api, orcaman uses a JWT which signs the user data with a RSA key. The
allowed users for orcaman have to be configured in the etcd backbone. The user logs in via
an Oauth2 Provider (at this time orcaman supports Google users, but other OAuth2 providers will
follow soon) and orcaman checks if the user is allowed to use orca.
orcaman is also a cli webservice provider. It populates all the webservices with a
simple HTTP Basic Auth backend. To disable other's to connect to this simple authentication
you should always put a reverse proxy in front of orcaman. You can also start the cli
services on a different interfaces (--clilisten ... so that they can only be used from localhost
whereas the Oauth-secured endpoints can listen on a public IP.
Cli
The cli support some basic commands to manage the system from the command line. To use it, you have to set two environment variables:
-
ORCA_SERVICE
The URL of the webservice backend. If you have more than one
orcamanrunning, specify one of the or use a loadbalancer in front. -
ORCA_TOKEN
Your token, which is displayed in the web UI of
orcaman. Keep this token secure or generate a new one if this token is compromized. It allows you to make service calls and you will be identified by this token
When both variables are set, you can simply call cli to see all options.
Tips
Using gitlab
When using git with orca in front of gitlab, you must use agent forwarding. So create a file named $HOME/.ssh/config with a content like:
Host gitlabgw
   ForwardAgent yes
where gitlabgw is the adress of orca. Now you can use git commands like git clone git@gitlab@gitlabgw:user/test.git and git will do agent forwarding. If you enabled 2FA in orca you must have a correct private key AND you will be prompted for a password (your TOTP).
Last but not least you can configure orca to use gitlab as the default host. And now you don't see any difference, you can do a git clone git@gitlabgw:user/test.git and orca will forward the request to your internal server gitlab.
 Directories
Directories
| Path | Synopsis |
|---|---|
|
This is a memory based buffer for simple key/value pairs where the pair will be removed after a specific time-to-live value.
|
This is a memory based buffer for simple key/value pairs where the pair will be removed after a specific time-to-live value. |