 README
README
Browsers Unbounded
🧭 Table of contents
- What is Browsers Unbounded?
- System components
- Quickstart for devs
- Observing networks with netstate
- UI
💀 Warning
This is prototype-grade software!
❓ What is Browsers Unbounded?
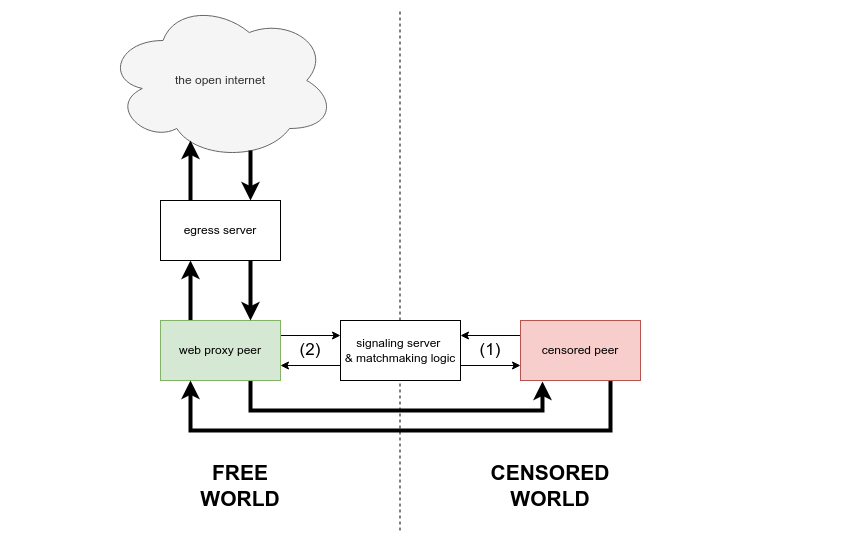
Browsers Unbounded is a system for distributed peer-to-peer proxying. The Browsers Unbounded system includes a browser-based client which enables volunteers to instantly provide proxying services just by accessing a web page. However, Browsers Unbounded is not just a web application! The Browsers Unbounded system introduces software libraries and protocol concepts designed to enable role-agnostic multi-hop p2p proxying across the entire Lantern network or on behalf of any circumvention tool that chooses to integrate it.
Put another way, Browsers Unbounded is a common language which enables circumvention tool users to describe, exchange, and share the resource of internet access across network boundaries and runtime environments.
💾 System components
| Module | Description |
|---|---|
| clientcore | library exposing Browsers Unbounded's high level client API |
| cmd | driver code for operationalizing Browsers Unbounded outside of a controlling process |
| common | data structures and functionality shared across Browsers Unbounded modules |
| egress | egress server |
| freddie | discovery, signaling, and matchmaking server |
| netstate | network topology observability tool |
| ui | embeddable web user interface |
▶ Quickstart for devs
-
Clone this repo.
-
Configure Mozilla Firefox to use a local HTTP proxy. In settings, search "proxy". Select Manual proxy configuration. Enter address
127.0.0.1, port1080, and check the box labeled Also use this proxy for HTTPS. -
Build the native binary desktop client:
cd cmd && ./build.sh desktop -
Build the native binary widget:
cd cmd && ./build.sh widget -
Build the browser widget:
cd cmd && ./build_web.sh -
Start Freddie:
cd freddie/cmd && PORT=9000 go run main.go -
Start the egress server:
cd egress/cmd && PORT=8000 go run egress.go -
Start a desktop client:
cd cmd/dist/bin && FREDDIE=http://localhost:9000 EGRESS=http://localhost:8000 ./desktop -
Decision point: do you want to run a native binary widget or a browser widget? To start a native binary widget:
cd cmd/dist/bin && FREDDIE=http://localhost:9000 EGRESS=http://localhost:8000 ./widget. Alternatively, to start a browser widget, follow the UI quickstart.
The widget and desktop client find each other via the discovery server, execute a signaling step, and establish several WebRTC connections.
- Start Mozilla Firefox. Use the browser as you normally would, visiting all your favorite websites. Your traffic is proxied in a chain: Firefox -> local HTTP proxy -> desktop client -> webRTC -> widget -> WebSocket -> egress server -> remote HTTP proxy -> the internet.
🕸 Observing networks with netstate
The netstate module is a work-in-progress tool for observing Browsers Unbounded networks. netstate currently visualizes network topology, labeling each Browsers Unbounded node with an arbitrary, user-defined "tag" which may be injected at runtime.
netstated is a distributed state machine which collects and processes state changes from Browsers Unbounded
clients. It serves a network visualization at GET /. The gv visualizer client looks for a
netstated instance at localhost:8080.
In the example below, we assume that Freddie is at http://localhost:9000 and the egress server
is at http://localhost:8000:
-
Start
netstated:cd netstate/d && go run netstated.go -
Start a widget as user Alice:
cd cmd/dist/bin && NETSTATED=http://localhost:8080/exec TAG=Alice FREDDIE=http://localhost:9000 EGRESS=http://localhost:8000 ./widget -
Start a desktop client as user Bob:
cd cmd/dist/bin && NETSTATED=http://localhost:8080/exec TAG=Bob FREDDIE=http://localhost:9000 EGRESS=http://localhost:8000 ./desktop -
Open a web browser and navigate to
http://localhost:8080. As Alice and Bob complete the signaling process and establish connection(s) to one another, you should see the network you have created. You must refresh the page to update the visualization.
🎨 UI
UI settings and configuration
The UI is bootstrapped with Create React App. Then "re-wired" to build one single js bundle entry using rewire.
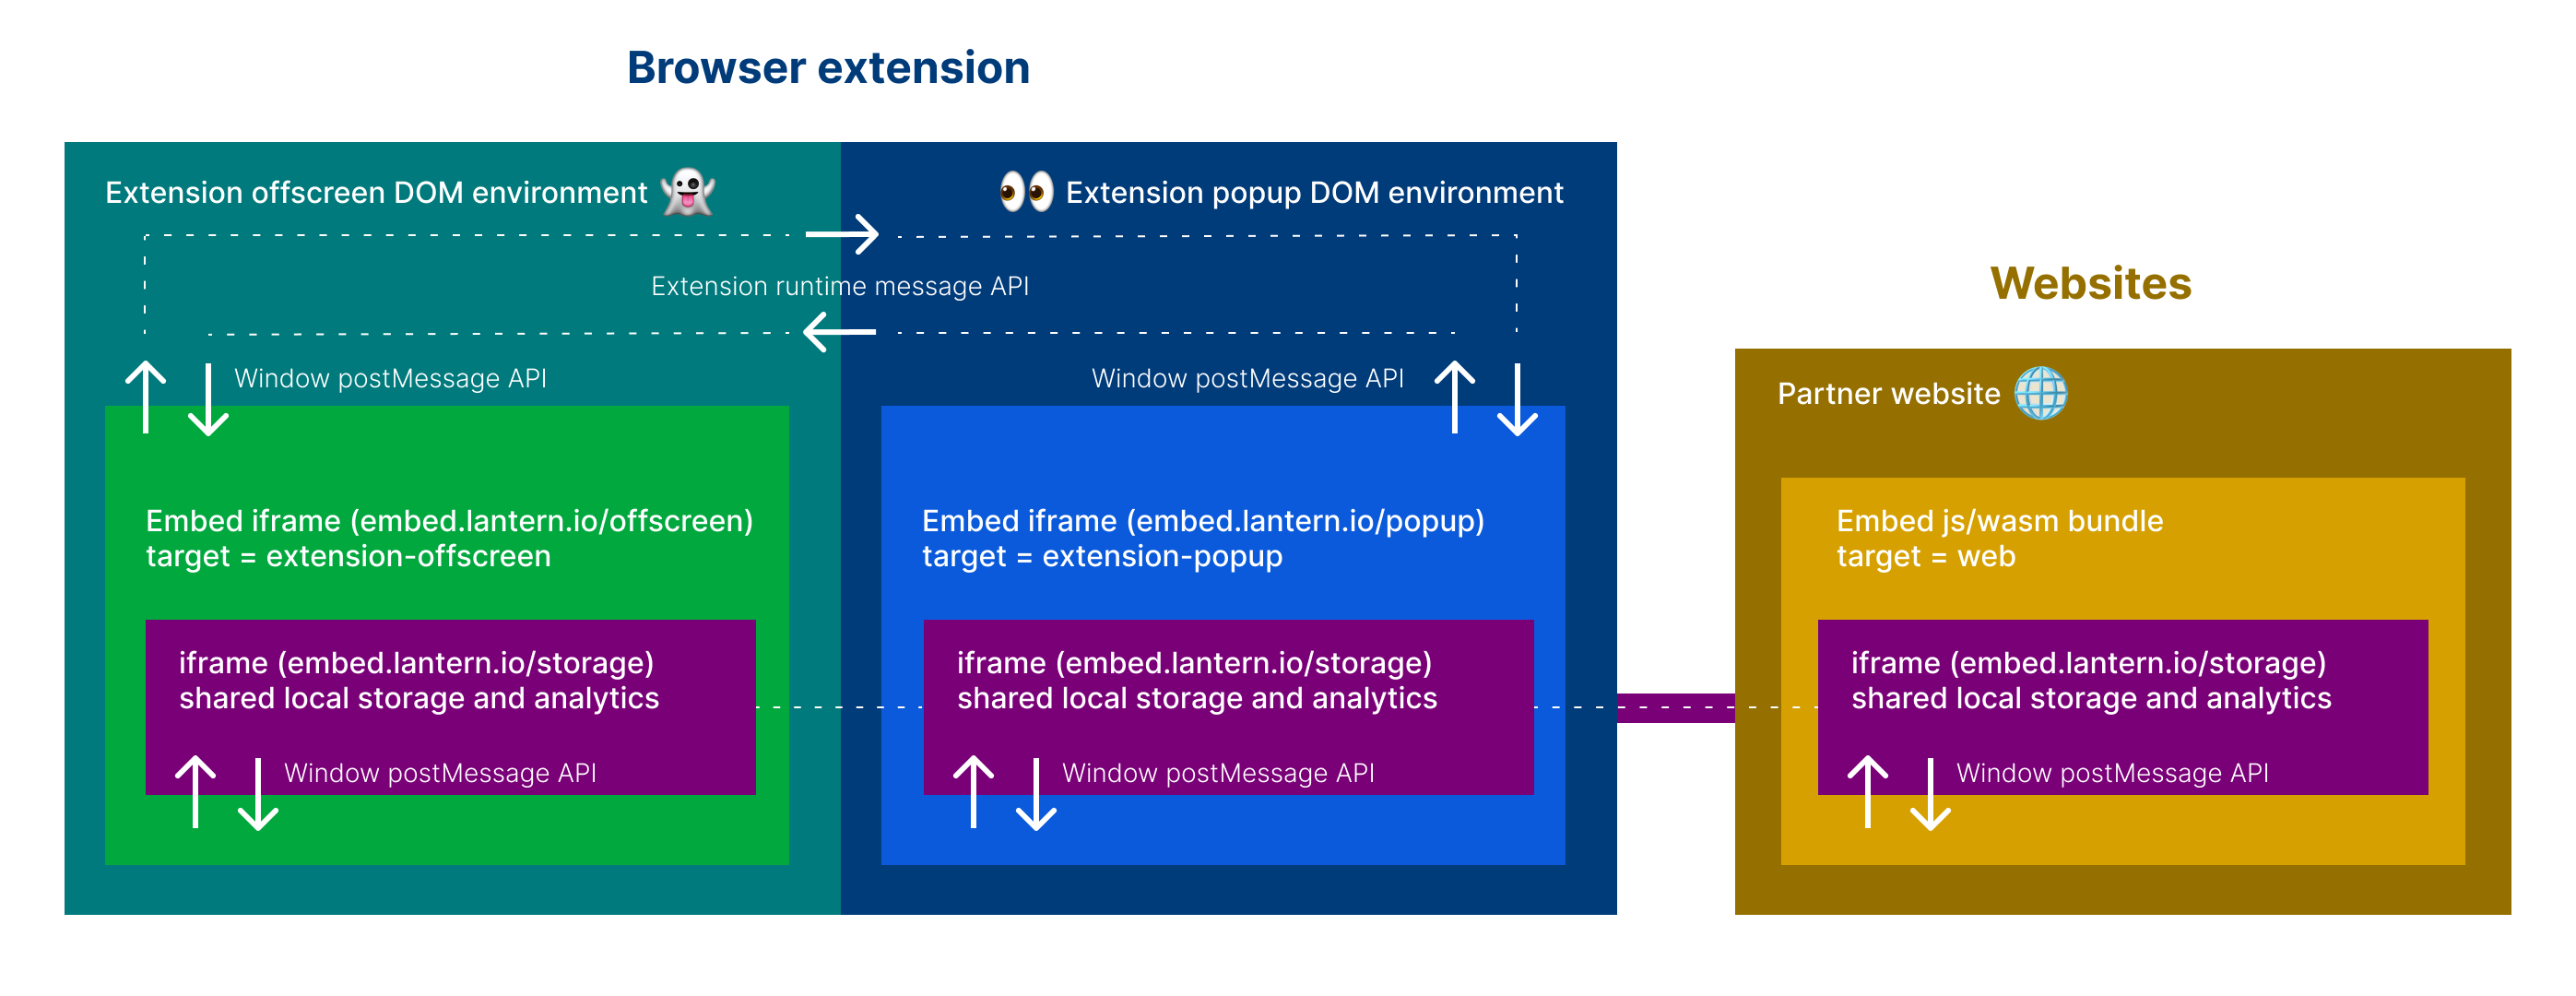
The React app will bind to a custom <browsers-unbounded> DOM el and render based on settings passed to the dataset.
In development, this html can be found in ui/public/index.html. In production, the html is supplied by the "embedder" via https://unbounded.lantern.io/embed.
Example production embed:
<browsers-unbounded
   data-layout="banner"
   data-theme="dark"
   data-globe="true"
   data-exit="true"
   style='width: 100%;'
></browsers-unbounded>
<script defer="defer" src="https://embed.lantern.io/static/js/main.js"></script>
This tables lists all the available settings that can be passed to the <browsers-unbounded> DOM el via the data-* attributes.
The "default" column shows the default value if the attribute is not set.
| dataset | description | default |
|---|---|---|
| layout | string "banner" or "panel" layout | banner |
| theme | string "dark", "light" or "auto" (browser settings) theme | light |
| globe | boolean to include webgl globe | true |
| exit | boolean to include toast on exit intent | true |
| menu | boolean to include menu | true |
| keep-text | boolean to include text to keep tab open | true |
| mobile-bg | boolean to run on mobile background | false |
| mobile-bg | boolean to run on desktop background | true |
| editor | boolean to include debug dataset editor | false |
| branding | boolean to include logos | true |
| mock | boolean to use the mock wasm client data | false |
| target | string "web", "extension-offscreen" or "extension-popup" | web |
In development, these settings can be customized using the REACT_APP_* environment variables in the .env or in your terminal.
For example, to run the widget in "panel" layout, you can run REACT_APP_LAYOUT=panel yarn start. To run the widget with mock data,
you can run REACT_APP_MOCK=true yarn start.
Settings can also be passed to the widget via the data-* attributes in ui/public/index.html. For example, to run the widget in "panel" layout,
you can set data-layout="panel" in ui/public/index.html.
If you enable the editor (by setting REACT_APP_EDITOR=true or data-editor="true"), you can also edit the settings dynamically in the browser using a UI editor the renders above the widget.
Note that the mock and target settings are not dynamic and therefore not editable in the browser. These two settings are static and must be set at the time the wasm interface is initialized.
Links:
UI quickstart for devs
- Work from the ui dir:
cd ui - Install deps:
yarn
Development:
- Copy the example env:
cp .env.development.example .env.development - Start the dev server:
yarn dev:weband open http://localhost:3000 to view it in the browser.
Production:
- Copy the example env:
cp .env.production.example .env.production - Build and deploy prod bundle to Github page:
yarn deploy
UI deep dive for devs
-
Work from the ui dir:
cd ui -
Configure your .env file:
cp .env.development.example .env.development- Set
REACT_APP_WIDGET_WASM_URLto your intended hostedwidget.wasmfile. If you are serving it fromclientin step #8, use http://localhost:9000/widget.wasm. If you ran./build_web.sh(step #7) you can also use/widget.wasm. To config for prod point to a publicly hostedwidget.wasme.g.https://embed.lantern.io/widget.wasm. If you know you know, if not, you likely want to use/widget.wasm. - Set
REACT_APP_GEO_LOOKUP_URLto your intended geo lookup service. Most likelyhttps://geo.getiantem.org/lookuporhttp://localhost:<PORT>/lookupif testing geo lookups locally - Set
REACT_APP_STORAGE_URLto your intended iframe html for local storage of widget state and analytics. Most likelyhttps://embed.lantern.io/storage.htmlor/storage.htmlif testing locally - Set any
REACT_APP_*variables as needed for your development environment. See UI settings and configuration for more info. - Configure the WASM client endpoints:
REACT_APP_DISCOVERY_SRV,REACT_APP_DISCOVERY_ENDPOINT,REACT_APP_EGRESS_ADDR&REACT_APP_EGRESS_ENDPOINT
- Set
-
Install the dependencies:
yarn -
To start in developer mode with hot-refresh server (degraded performance): run
yarn dev:weband visit http://localhost:3000 -
To build optimized for best performance:
- First configure your .env file:
cp .env.production.example .env.production(see Step 2) - Run
yarn build:web
- First configure your .env file:
-
To serve a build:
- Install a simple server e.g.
npm install -g serve(or your lightweight http server of choice) - Serve the build dir e.g.
cd build && serve -s -l 3000and visit http://localhost:3000
- Install a simple server e.g.
-
To deploy to Github pages:
yarn deploy -
Coming soon to a repo near you:
yarn test
Browser extension quickstart for devs
-
Work from the ui dir:
cd ui -
Install the dependencies:
yarn -
Configure your .env file:
cd extension && cp .env.example .env- Set
EXTENSION_POPUP_URLto your intended hosted popup page. If you are serving it fromuiin step #6, use http://localhost:3000/popup. To use prod, set to https://embed.lantern.io/popup. - Set
EXTENSION_OFFSCREEN_URLto your intended hosted offscreen page. If you are serving it fromuiin step #6, use http://localhost:3000/offscreen. To use prod, set to https://embed.lantern.io/offscreen.
- Set
-
To start in developer mode with hot-refresh server:
yarn dev:ext chrome
yarn dev:ext firefox
This will compile the extension and output to the ui/extension/dist dir. You can then load the unpacked extension in your browser of choice.
- For Chrome, go to chrome://extensions and click "Load unpacked" and select the
ui/extension/dist/chromedir. - For Firefox, go to about:debugging#/runtime/this-firefox and click "Load Temporary Add-on" and select the
ui/extension/dist/firefox/manifest.jsonfile. - For Edge, go to edge://extensions and click "Load unpacked" and select the
ui/extension/dist/edgedir.
- To build for production:
yarn build:ext chrome
yarn build:ext firefox
This will compile the extension and output a compressed build to the ui/extension/packages dir.
 Directories
Directories
| Path | Synopsis |
|---|---|
|
broflake.go defines mid-layer abstractions for constructing and describing a Broflake instance
|
broflake.go defines mid-layer abstractions for constructing and describing a Broflake instance |
|
client_default_impl.go is the entry point for standalone builds for non-wasm build targets
|
client_default_impl.go is the entry point for standalone builds for non-wasm build targets |
|
netstate
|
|