 README
README


shfz
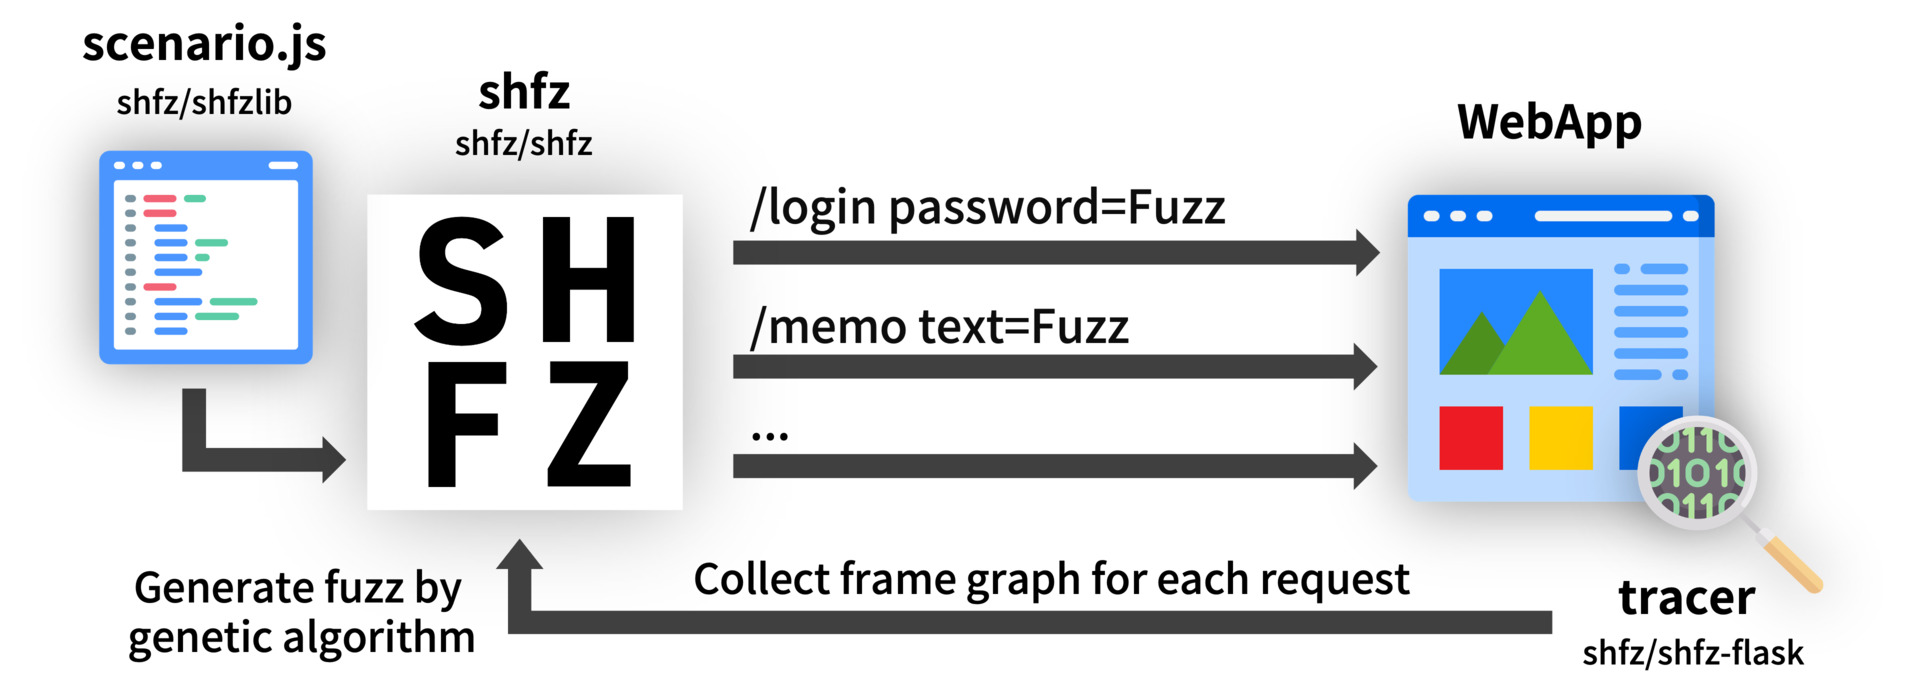
A scenario-based web application fuzzng tool that supports fuzz generation by genetic algorithm.

Features
- Easy to customize fuzzing test by scripting fuzzing scenario in JavaScript / TypeScript
- Third-party packages can be used in fuzzing scenario script
- Genetic algorithm fuzz generation increases code coverage
- High affinity with CI, automatically post a report to GitHub issue
- tracer's Automatic error detection helps fix bugs
Install
Download binary from Releases page, or compile from source.
Linux (amd64)
$ curl -Lo shfz.tar.gz https://github.com/shfz/shfz/releases/download/v0.0.3/shfz_0.0.3_linux_amd64.tar.gz
$ tar -zxvf shfz.tar.gz
$ sudo mv shfz /usr/local/bin/
$ sudo chmod +x /usr/local/bin/shfz
Usage
- Create scenario
To run fuzzing test with this tool, you need to create a scenario (that calls http requests for the web application, with automatically embeds the fuzz in the request parameter such as username, password).
Please refer to shfz/shfzlib for how to script scenarios.
- Install tracer to web application (only Flask)
For genetic algorithm fuzz generation and automatic error detection, it is necessary to install the trace library shfz/shfz-flask in the web application.
Currently, the trace library is only compatible with Python Flask. (supported frameworks will be expanded in the future)
- shfz server
check Server
- shfz run
check Run
- Get result
check Result
Server
In order to aggregate the results of fuzzing or generate fuzz by genetic algorithm, it is necessary to start the server.
$ shfz server
By default, the http server starts on port 53653 on localhost.
This server interacts with scenario and tracer to collect fuzz and frame graph data and supports fuzz generation with genetic algorithms.
Run
After setting up the server, specify the scenario file in another terminal and execute fuzzing.
$ shfz run -f scenario.js -n 100 -p 3 -t 30
[+] Finish
options
-f,--filescenario file (required)-n,--numbertotal number of executions (default 1)-p,--parallelnumber of parallel executions (default 1)-t,--timeoutscenario execution timeout(seconds) (default 30)
Result
You can get the result by sending a request to the server's the /data endpoints during or after fuzzing.
$ curl -s http://localhost:53653/data | jq

{
  "status": [
    {
      "name": "login",
      "UsedFuzzs": [
        {
          "id": "0000",
          "fuzz": [
            {
              "name": "user",
              "text": "abcabc"
            }
          ],
...
CI integration
You can also install shfz on your local machine and run fuzzing, but we recommend run shfz on CI.
Github Actions
check demo-webapp's fuzzing workflow
- Create fuzzing scenario in
/fuzzdirectory.
https://github.com/shfz/demo-webapp/tree/main/fuzz
      - uses: actions/setup-node@v2
        with:
          node-version: "16"
      - name: setup fuzzing scenario
        run: |
          cd fuzz
          npm i
          ./node_modules/typescript/bin/tsc scenario.ts
          file scenario.js
- Setup webapp (by docker-compose).
      - name: setup webapp
        run: |
          docker-compose build
          docker-compose up -d
          docker-compose ps -a
If this webapp is created by Python Flask, install shfz/shfz-flask
Note.
If you use docker-compose to launch the webapp on Linux, you need to enable host.docker.internal.
    extra_hosts:
      - "host.docker.internal:host-gateway"
And shfztrace is initialised by
fuzzUrl="http://host.docker.internal:53653"from flask import * from shfzflask import shfztrace app = Flask(__name__) shfztrace(app, fuzzUrl="http://host.docker.internal:53653")
- Setup and run shfz
      - name: SHFZ setup
        uses: shfz/shfz-actions-setup@v0.0.3
        with:
          version: "0.0.3"

      - name: run fuzzing
        run: shfz run -f fuzz/scenario.js -n 100
- Report result in Issue & Export fuzzing data to Actions Artifacts
      - name: SHFZ report
        uses: shfz/shfz-actions-report@v0.0.2
        with:
          path: "/app"
- (Optional) Export application log to Actions Artifacts
      - name: export application log
        run: docker logs demo-webapp_app_1 > app.log
      - name: upload artifact
        uses: actions/upload-artifact@v2
        with:
          name: app.log
          path: ./app.log
image: Flaticon.com