 README
README
Viewscreen - a personal video streaming server
Features
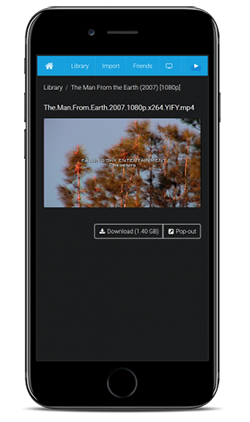
- Stream to any device
- Store your videos in the cloud and watch them from anywhere.
- Protect your IP address
- Torrent remotely on your server instead of your computer.
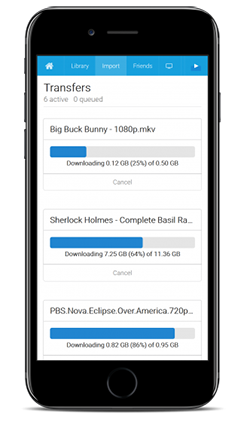
- Torrent on your phone
- Access the interface from any web browser on any device.
- Stream any video
- Convert videos file to the streamable (AAC/H264) MP4 format.
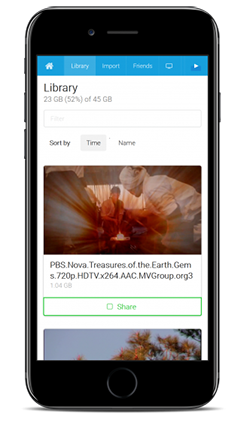
- Download from your friends
- See what your friends are sharing and copy their downloads directly to your server.
- Take your downloads offline
- Store videos on your local device for offline access.
Help / Reporting Bugs
Email viewscreen@portal.cloud
Run Viewscreen on a VPS
Running Viewscreen on a VPS is designed to be as simple as possible.
- Public Docker image
- Single static Go binary with assets bundled
- Automatic TLS using Let's Encrypt
- Redirects http to https
- Works with a reverse proxy or standalone
1. Get a server
Recommended Specs
- Type: VPS or dedicated
- Distribution: Ubuntu 16.04 (Xenial)
- Memory: 1GB+
- Storage: 5GB+
Recommended Providers
2. Add a DNS record
Create a DNS A record in your domain pointing to your server's IP address.
Example: viewscreen.example.com A 172.16.1.1
3. Enable Let's Encrypt
When enabled with the --letsencrypt flag, viewscreen runs a TLS ("SSL") https server on port 443. It also runs a standard web server on port 80 to redirect clients to the secure server.
Requirements
- Your server must have a publicly resolvable DNS record.
- Your server must be reachable over the internet on ports 80 and 443.
4. Standalone
# Install ffmpeg.
$ sudo add-apt-repository -y ppa:jonathonf/ffmpeg-3
$ sudo apt-get update
$ sudo apt-get install -y wget ffmpeg x264

# Download the viewscreen binary.
$ sudo wget -O /usr/bin/viewscreen https://github.com/xenking/viewscreen/raw/master/viewscreen-linux-amd64

# Make it executable.
$ sudo chmod +x /usr/bin/viewscreen

# Allow it to bind to privileged ports 80 and 443.
$ sudo setcap cap_net_bind_service=+ep /usr/bin/viewscreen

# Enable Let's Encrypt using your domain for automatic TLS configuration.
$ viewscreen --http-host viewscreen.example.com --http-username $USER --download-dir $HOME/Downloads --letsencrypt
INFO[0000] viewscreen URL: https://viewscreen.example.com/viewscreen
INFO[0001] Login credentials: <username> / <password>
Usage
Example usage:
$ viewscreen --letsencrypt --http-host viewscreen.example.com --download-dir /home/ubuntu/Downloads
Usage of viewscreen-linux-amd64:
  -backlink string
    	backlink (optional)
  -debug
    	debug mode
  -download-dir string
    	download directory (default "/data")
  -http-addr string
    	listen address (default ":80")
  -http-host string
    	HTTP host
  -http-prefix string
    	HTTP URL prefix (not supported yet) (default "/viewscreen")
  -http-username string
    	HTTP basic auth username (default "viewscreen")
  -letsencrypt
    	enable TLS using Let's Encrypt
  -metadata
    	use metadata service
  -reverse-proxy-header string
    	reverse proxy auth header (default "X-Authenticated-User")
  -reverse-proxy-ip string
    	reverse proxy auth IP
  -torrent-addr string
    	listen address for torrent client (default ":61337")
  -version
    	display version and exit
Run as a Docker container
The official image is viewscreen/viewscreen, which should run in any up-to-date Docker environment.
Follow the official Docker install instructions: Get Docker CE for Ubuntu
# Your download directory should be bind-mounted as `/data` inside the container using the `--volume` flag.
$ mkdir /home/<username>/Downloads

$ sudo docker create                            \
    --name viewscreen --init --restart always      \
    --publish 80:80 --publish 443:443           \
    --volume /home/<username>/Downloads:/data   \
    viewscreen/viewscreen:latest --letsencrypt --http-host viewscreen.example.com

$ sudo docker start viewscreen

$ sudo docker logs -f viewscreen
time="2027-01-19T00:00:00Z" level=info msg="viewscreen URL: https://viewscreen.example.com/viewscreen"
time="2027-01-19T00:00:00Z" level=info msg="Login credentials: viewscreen / 924433342"

INFO[0000] viewscreen URL: https://viewscreen.example.com/viewscreen
INFO[0001] Login credentials: viewscreen / 398032092
Updating the container image
Pull the latest image, remove the container, and re-create the container as explained above.
# Pull the latest image
$ sudo docker pull viewscreen/viewscreen

# Stop the container
$ sudo docker stop viewscreen

# Remove the container (data is stored on the mounted volume)
$ sudo docker rm viewscreen

# Re-create and start the container
$ sudo docker create ... (see above)
Using screen to run in debug mode
If you're having problems, it might help to run viewscreen in a screen session with debug logging enabled.
# Install screen
$ screen || sudo apt-get install -y screen

# Launch in a detached screen session.
$ screen -S viewscreen -d -m viewscreen --debug --letsencrypt --http-host <your domain name>

# List all screen sessions.
$ screen -ls

# Attach to the running session.
$ screen -r viewscreen

# Press ctrl-a + ctrl-d to detach.
Building
The easiest way to build the static binary is using the Dockerfile.build file. You can also build a docker image for running the binary.
# Download the git repo.
$ git clone https://github.com/xenking/viewscreen.git
$ cd viewscreen/

# Compile the code and create a Docker image for it.
$ sudo docker build --build-arg BUILD_VERSION=$(git rev-parse --short HEAD) -t viewscreen:build -f Dockerfile.build .

# Create a container based on the image we just built.
$ sudo docker create --name viewscreenbuild viewscreen:build

# Extract the binary from the image.
$ sudo docker cp viewscreenbuild:/usr/bin/viewscreen-linux-amd64 viewscreen-linux-amd64

# We're done with the build container.
$ sudo docker rm viewscreenbuild

# Inspect the binary.
$ file viewscreen-linux-amd64
viewscreen-linux-amd64: ELF 64-bit LSB  executable, x86-64, version 1 (GNU/Linux), statically linked, for GNU/Linux 2.6.32, BuildID[sha1]=c2a6f5a9e12c8c35117ec52c3572bf844c510957, stripped

# Run the binary.
$ ./viewscreen-linux-amd64 --help

# Build a tiny alpine "runner" image.
$ sudo docker build -t viewscreen:latest .
Thanks
Thanks to all the projects and developers that made this project possible.
- The free certificate for your server comes from Let's Encrypt, which is doing a lot of good in the world. Get your company to sponsor them!
 Documentation
Documentation

There is no documentation for this package.