 README
README
nats-server
nats-serverv1.0.0源码学习
按照其官网的说法,NATS是一个开源的、高性能的、简洁的、灵活的 适用于现代的可靠灵活的云和分布式系统的中枢系统。 说的很玄乎,实际上就是一个分布式 的消息队列系统,支持PubSub/ReqRsp 模型。其最初由Apcera领导开发,并实现了Ruby版本的服务器和客户端,其主要作者Derek Collison自称做了20多年的MQ,并经历过TIBOC、Rendezvous、EMC公司 根据github里面ruby-nats的日志显示在11年Derek实现了Ruby版本 的NATS服务器以及对应的客户端。然后在12年末,Derek又用Golang将服务器重写了一遍,并最终发现其效果更好,于是现在慢慢将Ruby版本的服务器淘汰了,现在 官网也只维护一个Golang版本的服务器,也就是我们这里的nats
NATS主要由Golang写的服务器“gnatsd”和一系列的客户端SDK组成,客户端有官方维护Golang、Node.js、Ruby、Java、C、C#以及Nginx C版本,除此之外还有社区贡献的Spring、Lua、PHP、Python、Scala、Haskell版本,基本覆盖了主流语言。 客户端和服务器之间通过一套本文协议进行通讯(想想Redis也是文本协议),因此可以和Redis一样可以通过Telnet进行调试,也因此只要按照文档中的描述,来 实现一套客户端(想想Redis那么多的客户端)。 具体的协议罗列在官方手册中,主要分成:
| 操作命令 | 由谁发送 | 描述 |
|---|---|---|
| INFO | Server | 当TCP握手完成后,由服务器发给客户端 |
| CONNECT | Client | 由客户端发送给服务器,带上连接的必要信息 |
| PUB | Client | 客户端发送一个发布消息给服务器 |
| SUB | Client | 客户端向服务器订阅一条消息 |
| UNSUB | Client | 客户端向服务器取消之前的订阅 |
| MSG | Server | 服务器发送订阅的内容给客户端 |
| PING | Both | PING keep-alive 消息 |
| PONG | Both | PONG keep-alive 响应 |
| +OK | Server | 在verbose模式下,确认正确的协议格式 |
| -ERR | Server | 表示协议错误,将端口连接 |
NATS实现了三种模式
- Publish Subscribe
- Request Reply
- Queueing
也就是MessageQueue常见的“发布订阅模式”、“请求响应模式”以及“消息队列模式”。
这里可以选择在GOPATH里面"git clone "+ "git checkout "。也可以利用现在的 go mod 在一个自己想放的目录里面进行编译(GO1.11版本既以上)。 比如这里我们要用来分析源码,所以放到一个"learn_gnatsd_source"的目录下。然后执行:
gnatsd-1.0.0 cz$ go mod init github.com/nats-io/gnatsd
go: creating new go.mod: module github.com/nats-io/gnatsd
go: copying requirements from vendor/manifest
然后执行编译:
gnatsd-1.0.0 cz$ go build
go: finding github.com/nats-io/nuid v1.0.0
go: finding golang.org/x/sys v0.0.0-20170627012538-f7928cfef4d0
go: finding golang.org/x/crypto v0.0.0-20161031180806-9477e0b78b9a
go: downloading golang.org/x/crypto v0.0.0-20161031180806-9477e0b78b9a
go: downloading github.com/nats-io/nuid v1.0.0
go: extracting github.com/nats-io/nuid v1.0.0
go: extracting golang.org/x/crypto v0.0.0-20161031180806-9477e0b78b9a
这里就可以在当前目录下看到编译好的gnatsd文件了。直接运行不用配置文件可以默认监听4222端口。
gnatsd-1.0.0 cz$ ./gnatsd
[45939] 2019/03/19 15:40:37.908062 [INF] Starting nats-server version 1.0.0
[45939] 2019/03/19 15:40:37.908385 [INF] Listening for client connections on 0.0.0.0:4222
[45939] 2019/03/19 15:40:37.908395 [INF] Server is ready
然后就可以用go的或者其他语言的客户端来进行连接了。
协议
在逐一学习代码前,我们来看下NATS支持的各种协议以及格式。
NATS的协议是个纯文本协议,因此可以通过使用类似telnet的方式来进行和上面的gnats之间的交互。比如:
gnatsd-1.0.0 cz$ telnet localhost 4222 Trying ::1... Connected to localhost. Escape character is '^]'. INFO {"server_id":"j2f6ynq4T2K5apG7A9hBud","version":"1.0.0","go":"go1.12","host":"0.0.0.0","port":4222,"auth_required":false,"ssl_required":false,"tls_required":false,"tls_verify":false,"max_payload":1048576}
可以看到,当客户端和服务器一连接的时候,服务器就会发一条INFO协议下来。
从上面也可以看到,NATS的协议大概是JSON格式(数据部分是byte数组)。基本格式为:
CMD \t payload \r\n
这里CMD可能是INFO/CONNECT/PUB/SUB等,"\t"写出来是表示那里有个空格,然后最后以"\r\n"来结束。所以本质上来说,NATS协议是和HTTP 类似的一种文本协议。
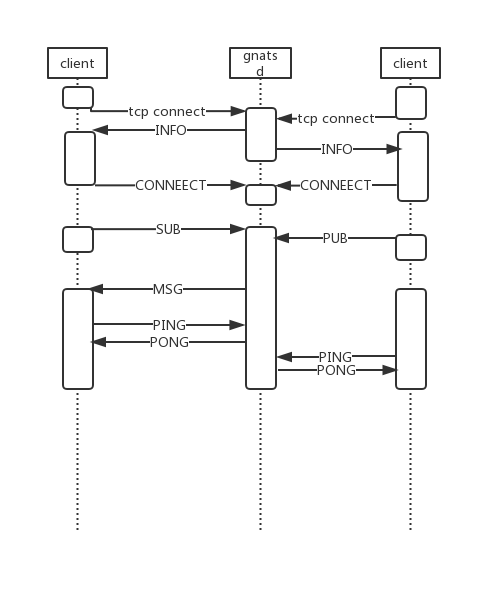
NATS和客户端交互的时序大概如图中。
- 客户端建立到gnats的TCP链接
- gnats向客户端发送INFO协议
- 客户端需要向服务器回一个CONNECT协议
- 然后根据需要,客户端订阅消息,发送SUB协议
- 其他客户端在建立链接后,发布消息,发送PUB协议
- 正常情况下,客户端和服务器间通过PING/PONG维护心跳
NATS就通过这样实现了一个订阅发布的系统。
INFO
CONNECT
PUB
SUB
UNSUB
MSG
PING/PONG
+OK
-ERR
代码目录结构
抛开第一级目录的其他文件,现在开始聚焦到server这个目录来:
server cz$ find . -name "*\.go" |grep -v test | xargs wc -l | sort -d -k 1
      12 ./pse/pse_solaris.go
      13 ./pse/pse_rumprun.go
      16 ./service.go
      23 ./pse/pse_darwin.go
      36 ./errors.go
      50 ./monitor_sort_opts.go
      55 ./ciphersuites_1.5.go
      56 ./util.go
      64 ./ciphersuites_1.8.go
      72 ./pse/pse_freebsd.go
      90 ./signal_windows.go
      93 ./const.go
      94 ./service_windows.go
     115 ./pse/pse_linux.go
     139 ./signal.go
     163 ./log.go
     190 ./auth.go
     268 ./pse/pse_windows.go
     527 ./monitor.go
     640 ./sublist.go
     648 ./reload.go
     738 ./parser.go
     762 ./route.go
     895 ./opts.go
    1047 ./server.go
    1410 ./client.go
    8216 total
抛开test文件,总共只有26个文件,8K代码。所以gnatsd核心还是比较简单的,休闲之余就可以将其代码通读一遍,跟着我们的文章走也很快。
Server构造
创建Server对象
在server.go里面有:
 100 // New will setup a new server struct after parsing the options.
 101 func New(opts *Options) *Server {
...

 123     s := &Server{
 124         configFile: opts.ConfigFile,
 125         info:       info,
 126         sl:         NewSublist(),
 127         opts:       opts,
 128         done:       make(chan bool, 1),
 129         start:      now,
 130         configTime: now,
 131     }
...
 157     return s
 }
创建Server的时候,用选项opts和配置文件opts.ConfigFile初始化一个Server对象,Server为:
  47 // Server is our main struct.
  48 type Server struct {
  49     gcid uint64
  50     grid uint64
  51     stats
  52     mu            sync.Mutex
  53     info          Info
  54     infoJSON      []byte
  55     sl            *Sublist
  56     configFile    string
  57     optsMu        sync.RWMutex
  58     opts          *Options
  59     running       bool
  60     shutdown      bool
  61     listener      net.Listener
  62     clients       map[uint64]*client
  63     routes        map[uint64]*client
  64     remotes       map[string]*client
  65     users         map[string]*User
  66     totalClients  uint64
  67     done          chan bool
  68     start         time.Time
  69     http          net.Listener
  70     httpHandler   http.Handler
  71     profiler      net.Listener
  72     httpReqStats  map[string]uint64
  73     routeListener net.Listener
  74     routeInfo     Info
  75     routeInfoJSON []byte
  76     rcQuit        chan bool
  77     grMu          sync.Mutex
  78     grTmpClients  map[uint64]*client
  79     grRunning     bool
  80     grWG          sync.WaitGroup // to wait on various go routines
  81     cproto        int64          // number of clients supporting async INFO
  82     configTime    time.Time      // last time config was loaded
  83     logging       struct {
  84         sync.RWMutex
  85         logger Logger
  86         trace  int32
  87         debug  int32
  88     }
  89 }
这里感性认识一下就好了,后面说到具体逻辑的时候回用到响应的成员。 运行Server 在main函数中,我们看到是通过:server.Run(s) 来启动Server的,他实际上在 services.go中:
  6 // Run starts the NATS server. This wrapper function allows Windows to add a
  7 // hook for running NATS as a service.
  8 func Run(server *Server) error {
  9     server.Start()
 10     return nil
 11 }
Server.Start()
先来看代码:
 237 func (s *Server) Start() {
 241     // Avoid RACE between Start() and Shutdown()
 242     s.mu.Lock()
 243     s.running = true
 244     s.mu.Unlock()
 245
 246     s.grMu.Lock()
 247     s.grRunning = true
 248     s.grMu.Unlock()
....
 259
 260     // Start monitoring if needed
 261     if err := s.StartMonitoring(); err != nil {
...
 265
 266     // The Routing routine needs to wait for the client listen
 267     // port to be opened and potential ephemeral port selected.
 268     clientListenReady := make(chan struct{})
 270     // Start up routing as well if needed.
 271     if opts.Cluster.Port != 0 {
 272         s.startGoRoutine(func() {
 273             s.StartRouting(clientListenReady)
 274         })
 275     }
 276
 277     // Pprof http endpoint for the profiler.
 278     if opts.ProfPort != 0 {
 279         s.StartProfiler()
 280     }
 281
 282     // Wait for clients.
 283     s.AcceptLoop(clientListenReady)
 284 }
最开始的地方通过mutex控制,设置服务状态的标记位。 然后启动Monitor监控以及接受其他服务消息的Router服务,需要的话启动Profile。 这里看最后一步s.AcceptLoop ,这里想象普通的网络程序,这里开启了一个Loop来接受客户端的TCP链接。
AcceptLoop
来看代码:
 370 // AcceptLoop is exported for easier testing.
 371 func (s *Server) AcceptLoop(clr chan struct{}) {
 ...

 430     for s.isRunning() {
 431         conn, err := l.Accept()
 432         if err != nil {
 433             if ne, ok := err.(net.Error); ok && ne.Temporary() {
 434                 s.Debugf("Temporary Client Accept Error(%v), sleeping %dms",
 435                     ne, tmpDelay/time.Millisecond)
 436                 time.Sleep(tmpDelay)
 437                 tmpDelay *= 2
 438                 if tmpDelay > ACCEPT_MAX_SLEEP {
 439                     tmpDelay = ACCEPT_MAX_SLEEP
 440                 }
 441             } else if s.isRunning() {
 442                 s.Noticef("Accept error: %v", err)
 443             }
 444             continue
 445         }
 446         tmpDelay = ACCEPT_MIN_SLEEP
 447         s.startGoRoutine(func() {
 448             s.createClient(conn)
 449             s.grWG.Done()
 450         })
 451     }
 452     s.Noticef("Server Exiting..")
 453     s.done <- true
 454 }
这里传入的clr,最终当循环退出时,会传递一个消息到channel中,通知启动Server.Start()的调用者,服务结束了。 而这里的:for s.isRunning() { 形成了真正的AcceptLoop等待客户端过来创建TCP链接。 每当Accept一条心链接后,开启一个goroutine用这个链接创建一个Client对象。 ReadLoop 创建client的代码是这样的:
 642 func (s *Server) createClient(conn net.Conn) *client {
...

 646     c := &client{srv: s, nc: conn, opts: defaultOpts, mpay: int64(opts.MaxPayload), start: time.Now()}
...

 658
 659     // Initialize
 660     c.initClient()

 664     // Send our information.
 665     c.sendInfo(info)
...

 743     // Spin up the read loop.
 744     s.startGoRoutine(func() { c.readLoop() })

...
}
首先创建一个client对象并将链接conn传个client。然后对client进行初始化,并向客户端发送INFO(想想在NATS 开源学习——0X00:协议 中介绍的协议) 。接着开启一个routinue执行client的readLoop。相关代码,等我们分析client的时候再展开,实际上就是从客户端读消息然后处理消息。 这块逻辑在1.4.x版本中有些不同,在新版本中还开启了一个writeLoop,用来flush缓存中的数据到客户端,这样做就可以对消息进行读写分离,并提高写的 效率。在1.0.0中还是读写在同一个goroutine里。
goroutine管理
看到上面的代码中,启动一个goroutine都是通过s.startGoRoutine整个函数的:
 987 func (s *Server) startGoRoutine(f func()) {
 988     s.grMu.Lock()
 989     if s.grRunning {
 990         s.grWG.Add(1)
 991         go f()
 992     }
 993     s.grMu.Unlock()
 994 }
这里显示用一个锁来控制对s.grWG的修改,然后给waitgroup s.grWG做增1操作. 然后在调用时有:
 447         s.startGoRoutine(func() {
 448             s.createClient(conn)
 449             s.grWG.Done()
 450         })
也就是client链接断开是做waitgroup的Done操作。 在Server的ShutDown里面有
 366     // Wait for go routines to be done.
 367     s.grWG.Wait()
等待所有链接断开并回收groutine。
时序
现在我们再回过头来看整个时序关系。
就大概了解了:
- 服务Server先开一个AcceptLoop用来接收客户端TCP链接。
- 接收到一个客户端的链接后,启动一个ReadLoop来接收客户端发送过来的消息。
- 整个readloop负责收消息然后处理消息,直到退出。
- 服务Server通过WaitGroup来管理所有的客户端链接状况。
Clinet服务
协议解析
订阅消息
消息存储结构
发布消息
Router转发
测试代码
 Documentation
Documentation

There is no documentation for this package.